
There’s something about summer grilling that makes everything taste better, but let’s be honest – most veggie sides at cookouts are pretty boring. While everyone else is bringing the same old potato salad or coleslaw, you can show up with something that actually makes people excited about eating their vegetables. These char-grilled veggie skewers with balsamic glaze are so good that they might just steal the spotlight from the burgers and hot dogs. The secret isn’t just throwing vegetables on a stick – it’s all about that tangy, slightly sweet glaze that caramelizes on the grill.
Why this balsamic glaze changes everything
Most grilled vegetables end up pretty bland because people just toss them on the grill with some salt and pepper. The real game-changer here is the balsamic glaze that you brush on while cooking. This isn’t some fancy sauce that requires a culinary degree – you just whisk together balsamic vinegar, olive oil, Dijon mustard, garlic, and a bit of maple syrup or honey. The vinegar gives you that tangy kick, the mustard adds depth, and the sweetness balances everything out perfectly. When this mixture hits the hot grill, it caramelizes and creates this amazing coating that makes the vegetables taste like they came from an expensive restaurant.
The best part is you can make this glaze ahead of time and keep it in your fridge for up to a week. That means you can whip up these skewers any night of the week without much prep work. Some people even use the leftover glaze on salads, as a marinade for chicken or steak, or for dipping grilled bread. It’s one of those versatile sauces that you’ll find yourself reaching for all summer long. Just remember to reserve some of the glaze before you start brushing it on raw vegetables so you have clean sauce for serving.
Picking the right vegetables for your skewers
Not all vegetables are created equal when it comes to grilling on skewers. You want to pick firm vegetables that can handle the heat without turning into mush. Bell peppers are perfect – they hold their shape, get nice char marks, and the different colors make your skewers look amazing. Zucchini and summer squash work great too, especially when you cut them into thick rounds. Red onions are a must because they get slightly sweet and caramelized on the grill. Cherry tomatoes add a pop of color and juiciness, while mushrooms bring that meaty texture that makes these skewers satisfying enough to eat as a main dish.
The key is cutting everything to similar sizes so they cook evenly. Aim for about one-inch pieces across the board. If you cut the bell peppers too thin, they’ll cook way faster than thick chunks of onion, and you’ll end up with some vegetables that are perfect while others are either raw or burnt. Some people like adding pineapple chunks to their veggie skewers for a sweet contrast – the balsamic glaze works surprisingly well with fruit. Eggplant can work too, though it tends to soak up a lot of the glaze, which isn’t necessarily a bad thing if you’re into that.
The wooden skewer situation nobody talks about
Here’s something that catches a lot of people off guard: if you use wooden skewers without soaking them first, they’ll catch fire on your grill. It’s not a huge disaster, but it’s annoying and can ruin your skewers. The fix is super simple – just throw your wooden skewers in a pan or bowl of water for at least 20 minutes before you start threading on the vegetables. Some people soak them for an hour or even longer if they remember ahead of time. The water gets absorbed into the wood and prevents it from burning when it hits the hot grill grates.
If you’re tired of dealing with wooden skewers, metal ones are a good investment. They don’t burn, they’re reusable, and they conduct heat which can actually help cook the vegetables from the inside. The downside is they get really hot, so you need to use tongs or grill gloves to flip them. Some metal skewers have flat designs instead of round, which is genius because it keeps the vegetables from spinning around when you try to turn them. Whether you go with wood or metal, make sure you don’t overcrowd the skewers – leave a little space between pieces so the heat can circulate and everything cooks evenly.
Getting your grill ready the right way
Preheating your grill properly makes a huge difference in how your skewers turn out. You want medium-high heat, which is usually around 375-400 degrees if your grill has a thermometer. If it doesn’t, hold your hand about six inches above the grates – if you can only keep it there for about three or four seconds before it gets too hot, you’re in the right range. Clean your grill grates well before cooking because old stuck-on food can make your vegetables stick. A quick brush with a grill brush while the grates are heating up does the trick.
Once your grill is hot, lightly oil the grates to create a non-stick surface. You can use a paper towel dipped in vegetable oil and held with tongs to wipe down the grates. Some people spray the actual skewers with cooking spray before putting them on the grill, which also helps prevent sticking. The goal is to get nice char marks on your vegetables without them welding themselves to the grill. If you’re using a gas grill, you have more control over the temperature. With charcoal, you might need to move the skewers around to cooler spots if they’re cooking too fast or starting to burn before they’re tender.
The actual grilling process explained simply
Start by placing your skewers on the grill without any glaze – just let them cook for a couple minutes per side until you see grill marks forming. This initial searing gives you those nice charred bits that add so much character. After the vegetables have some color on them, that’s when you start brushing on the balsamic glaze. The reason you wait is because if you put the glaze on too early, the sugars in it can burn before the vegetables are actually cooked through. Nobody wants bitter, burnt vegetables.
Once you start applying the glaze, reduce your heat to medium or move the skewers to a cooler part of the grill. Keep flipping them every minute or so, brushing on more glaze each time. The total cooking time is usually around 10-15 minutes, depending on how thick you cut your vegetables and how hot your grill is running. You want the vegetables to be tender but still have a little bite to them – nobody likes mushy grilled vegetables. The glaze will get sticky and caramelized, creating this shiny coating that looks as good as it tastes. Right before you take them off the grill, give them one final brush of glaze for maximum impact.
Making these ahead for meal prep or parties
One of the best things about these veggie skewers is how well they work for meal prep. You can chop all your vegetables and thread them onto skewers up to two days before you plan to grill them. Just cover them tightly with plastic wrap or put them in a container and stick them in the fridge. The vegetables hold up surprisingly well and don’t get soggy or weird. The glaze can be made even further in advance – it keeps in the fridge for at least a week in a sealed container. This makes it really easy to have a quick, healthy side dish ready to go on busy weeknights.
If you’re making these for a party or cookout, you can also grill them completely ahead of time and serve them at room temperature. They’re actually really good that way – not quite as amazing as fresh off the grill, but still delicious. Some people grill a big batch on Sunday and eat them throughout the week as a quick vegetable side with whatever else they’re having for dinner. You can even pull the vegetables off the skewers after grilling and toss them with pasta, add them to salads, or stuff them into wraps. The balsamic glaze keeps them tasting good even after a few days in the fridge.
What to serve alongside these skewers
These veggie skewers are versatile enough to work as either a side dish or a main course, depending on how you approach them. As a side, they go perfectly with all the typical grilled stuff – burgers, hot dogs, grilled chicken, steak, or ribs. They add color and freshness to your plate without being heavy or filling. A lot of people serve them at summer cookouts alongside classic sides like potato salad, pasta salad, or corn on the cob. The tangy balsamic glaze is a nice contrast to richer, creamier sides.
If you want to make these skewers the star of the meal, serve them over rice, quinoa, or couscous with some hummus or tzatziki on the side. Adding some grilled bread for dipping in the extra glaze turns it into a really satisfying vegetarian meal. Some people crumble feta cheese over the top or add a squeeze of fresh lemon juice right before serving. These skewers are also great in grain bowls – just slide the vegetables off the skewers and arrange them over your grains with whatever other toppings you like. The leftovers make excellent additions to omelets or frittatas for breakfast the next day.
Common mistakes and how to avoid them
The biggest mistake people make is cutting their vegetables different sizes, which means some pieces are burnt while others are still crunchy. Take the extra minute to cut everything uniformly – it makes a huge difference. Another common issue is overcrowding the skewers. If you jam the vegetables too tightly together, they steam instead of getting those nice char marks. Leave a little breathing room between pieces. Also, don’t skip the step of lightly oiling your grill grates – vegetables have a tendency to stick, and there’s nothing more frustrating than losing half your peppers to the grill.
People also tend to use too high of heat once they start adding the glaze, which causes burning instead of caramelizing. Remember to drop the temperature or move to indirect heat once that glaze goes on. Not soaking wooden skewers is another rookie move that leads to charred, brittle sticks. And finally, don’t forget to save some clean glaze for serving – you don’t want to use the glaze that’s been brushed on raw vegetables as your finishing sauce. Just set aside a few tablespoons in a separate container before you start grilling, and use that for drizzling over the finished skewers.
Ways to customize these to your taste
The basic recipe is fantastic as-is, but there’s plenty of room to make it your own. If you like things spicy, add some red pepper flakes to the glaze or use a spicy brown mustard instead of Dijon. Fresh herbs are another easy addition – throwing some chopped fresh thyme, rosemary, or basil into the glaze gives it a whole different character. Some people swap out the maple syrup for honey, agave, or even brown sugar. They all work fine and just give slightly different sweetness levels.
You can also play around with the vegetables based on what you have or what’s in season. Asparagus, Brussels sprouts (halved), cauliflower florets, and even thick slices of sweet potato all work on skewers. Some folks add halloumi cheese or tofu cubes for extra protein. The glaze works with pretty much any vegetable combination you can think of. If you’re not a fan of balsamic vinegar, you could try the same technique with a teriyaki glaze, a lemon-herb marinade, or even a barbecue sauce. The method of grilling first and then glazing works with all kinds of different sauces and seasonings.
These char-grilled veggie skewers with balsamic glaze prove that vegetables don’t have to be boring or bland. The combination of smoky char from the grill and that sweet-tangy glaze creates something way more interesting than your typical veggie side dish. Whether you’re feeding a crowd at a summer cookout or just trying to eat more vegetables during the week, these skewers make it easy and actually enjoyable. Once you nail the basic technique, you’ll probably find yourself making them all the time with whatever vegetables you have on hand.
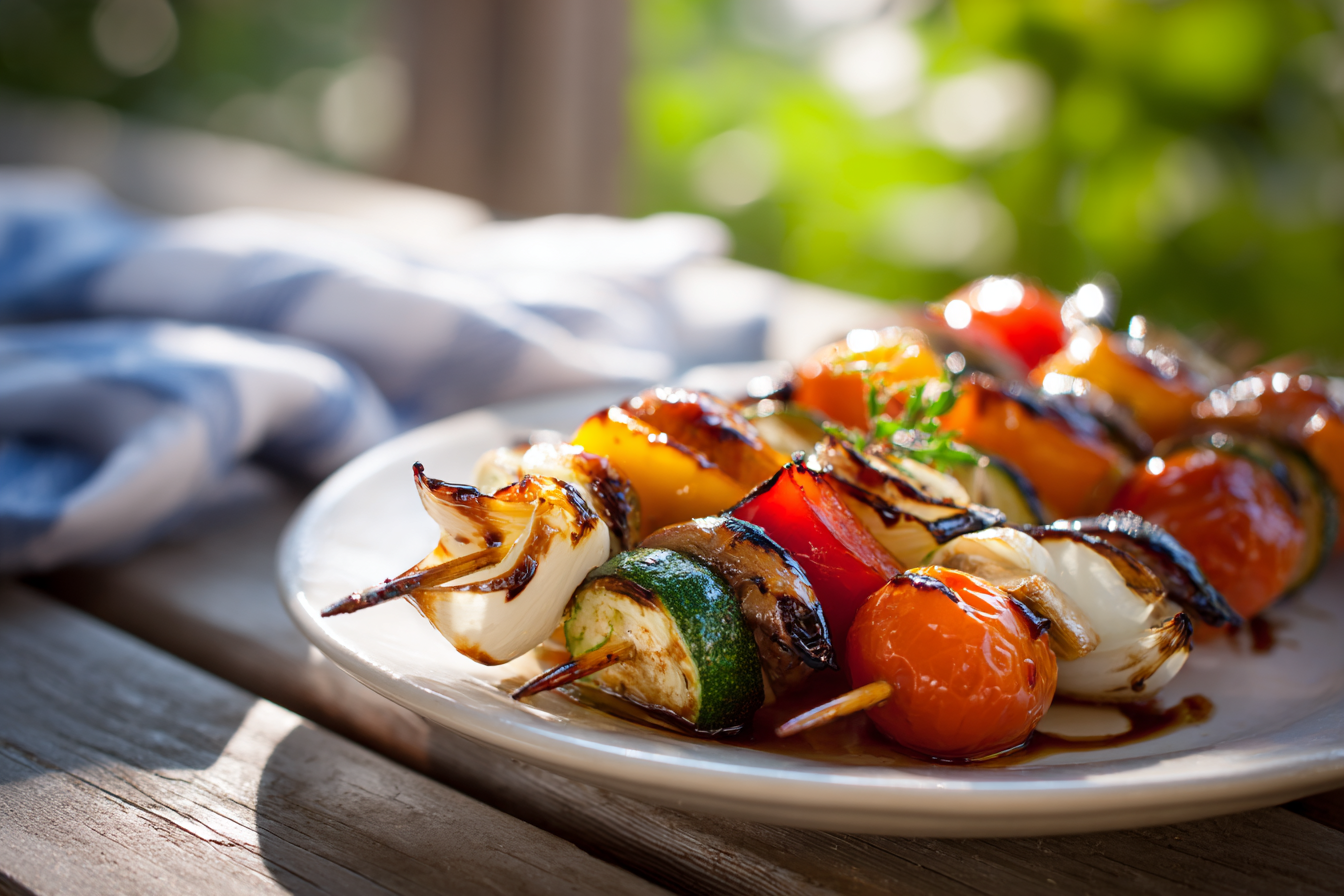
Char-Grilled Veggie Skewers With Balsamic Glaze
Cuisine: American8
skewers20
minutes15
minutes57
kcalSmoky grilled vegetables brushed with a tangy balsamic glaze that caramelizes perfectly on the grill, creating a side dish that might just outshine the main course.
Ingredients
2 medium red onions, cut into chunks
2 medium zucchini, cut into 1/2-inch rounds
2 medium summer squash, cut into 1/2-inch rounds
2 red bell peppers, seeded and cut into 1-inch pieces
8 oz mushrooms, halved
1/2 cup balsamic vinegar
1 tablespoon extra virgin olive oil
1/4 cup water
2 cloves garlic, finely minced
1 tablespoon Dijon mustard
2 teaspoons maple syrup
1 teaspoon Italian seasoning
1/2 teaspoon salt
Freshly ground black pepper to taste
Cooking spray for grill
Directions
- Place at least 8-10 wooden skewers in a pan or bowl of water and let them soak for at least 20 minutes, though 30 minutes is even better. This prevents the skewers from burning on the grill. While they’re soaking, you can prep your vegetables and make the glaze.
- In a small bowl, whisk together the balsamic vinegar, olive oil, water, minced garlic, Dijon mustard, maple syrup, Italian seasoning, salt, and several grinds of black pepper until well combined. Set aside about 3-4 tablespoons of this glaze in a separate container for drizzling on the finished skewers. You don’t want to use the glaze that touched raw vegetables as your finishing sauce.
- Prepare all your vegetables by cutting them into similar-sized pieces, roughly 1-inch chunks or rounds. For the red onions, cut off the ends, peel them, slice in half lengthwise, then cut each half into quarters. Seed the bell peppers and chop into 1-inch pieces. Cut the zucchini and summer squash into rounds about 1/2-inch thick. Halve the mushrooms if they’re large.
- Thread the vegetables onto the soaked skewers, alternating between different types and colors for visual appeal. Don’t pack them too tightly – leave a little space between pieces so heat can circulate. A good pattern is onion, zucchini, bell pepper, mushroom, squash, and repeat. Lightly spray the assembled skewers with cooking spray on all sides.
- Preheat your grill to medium-high heat (about 375-400°F). Clean the grill grates well with a grill brush, then lightly oil them using a paper towel dipped in vegetable oil held with tongs. This prevents the vegetables from sticking to the grates.
- Place the skewers on the grill and cook for about 2 minutes undisturbed, allowing grill marks to form. Flip the skewers and cook another 2 minutes on the other side. At this point, you’re just getting some initial char and grill marks – the vegetables won’t be fully cooked yet.
- Now start brushing the balsamic glaze generously over all sides of the vegetables. Reduce the heat to medium or move the skewers to a cooler part of the grill to prevent the glaze from burning. Continue grilling, flipping the skewers every minute or so and brushing with more glaze each time you turn them. The total cooking time should be 10-15 minutes, depending on how tender you like your vegetables.
- Remove the skewers from the grill when the vegetables are tender with nice char marks and the glaze has caramelized into a sticky coating. Transfer to a serving platter and drizzle with the reserved clean glaze that you set aside earlier. Serve immediately while hot, or let cool to room temperature – they’re delicious either way.
Notes
- If using metal skewers instead of wooden ones, skip the soaking step but remember they’ll get very hot, so use tongs or grill gloves to handle them.
- You can prep the vegetables and assemble the skewers up to 2 days ahead. Cover tightly and refrigerate until ready to grill.
- The balsamic glaze keeps in the fridge for up to a week, so make a double batch and use it on salads, grilled chicken, or other vegetables.
- Feel free to substitute or add other vegetables like cherry tomatoes, asparagus, or eggplant based on what you have available.
- Leftover grilled vegetables can be stored in the fridge for up to 5 days and used in salads, grain bowls, wraps, or omelets.
Frequently asked questions
Q: Can I make these in the oven if I don’t have a grill?
A: Absolutely. Preheat your oven to 425°F and arrange the skewers on a baking sheet lined with parchment paper or foil. Roast for about 20-25 minutes, flipping halfway through and brushing with the glaze. You won’t get the same smoky char, but they’ll still be delicious. You can also finish them under the broiler for a minute or two to get some caramelization on the glaze.
Q: How do I keep the vegetables from spinning around on the skewers?
A: Use flat metal skewers instead of round ones, or thread two parallel skewers through each set of vegetables. This creates more stability and makes flipping much easier. With wooden skewers, try to thread through the flattest part of each vegetable piece to minimize spinning.
Q: Can I use a different type of vinegar instead of balsamic?
A: You can, though the taste will be different. Red wine vinegar or apple cider vinegar would work, but you might want to add a bit more sweetener since balsamic has natural sweetness. White balsamic is another option that gives you the same tangy-sweet balance with a lighter color.
Q: Why do my vegetables always stick to the grill?
A: Make sure your grill grates are clean and well-oiled before you start cooking. Also, don’t try to flip the vegetables too soon – let them develop grill marks first, and they’ll release more easily. Using a light coating of cooking spray on the actual skewers helps too. If sticking is a constant problem, consider using a grill basket instead of skewers.