
There’s something almost magical about biting into a really good cheeseburger. The problem is that most homemade versions end up dry, bland, or just missing that special something that makes restaurant burgers so good. Turns out, the secret isn’t some fancy technique or expensive equipment. It’s actually about adding a few simple ingredients that most people skip, plus making a sauce that’ll have everyone asking what’s in it. Once you know these tricks, you’ll never settle for a boring burger again.
Why Worcestershire sauce makes all the difference
Most people just season their burger patties with salt and pepper, then wonder why they taste flat. The real game-changer is adding Worcestershire sauce right into the meat before you form the patties. Just a couple tablespoons mixed into two pounds of ground beef transforms everything. It adds this deep, savory taste that makes people think you did something really complicated when you absolutely didn’t. The sauce has all these fermented ingredients that bring out the beefiness in a way that salt alone never could.
When you’re mixing seasonings into your ground beef, add garlic powder and mustard powder too. These dry spices spread evenly throughout the meat and give every bite more depth. The mustard powder especially adds a subtle tang that most people can’t quite identify but definitely notice. Don’t overwork the meat though, just gently fold everything together until it’s combined. Squeezing and kneading the beef too much makes the burgers tough and dense instead of tender and juicy.
The secret sauce everyone will ask about
Here’s where things get really good. Almost every great burger sauce starts with mayo and ketchup, but the magic happens with what else you add. Pickle juice is the surprising ingredient that changes everything. Instead of using relish, which makes the sauce chunky and can make your bun soggy, pickle juice gives you all that briny, tangy goodness in a smooth sauce. Mix in garlic powder, dried dill, lime juice, smoked paprika, a tiny bit of cayenne, and stone ground mustard. This combination creates something that tastes way more interesting than plain ketchup and mayo.
You can make this burger sauce several days ahead and keep it in the fridge, which actually makes it taste even better as everything blends together. The smoked paprika adds a subtle smokiness that makes people think you did something fancy to the burgers themselves. Start with half a teaspoon of cayenne if you’re not sure about spice levels. The amount in the recipe gives just a gentle warmth, not actual heat. Slather this sauce generously on both the top and bottom buns for maximum effect.
Getting the beef blend right matters more than you think
Walk into any grocery store and you’ll see ground beef ranging from 90/10 to 73/27, referring to the lean-to-fat ratio. For burgers, you want 80/20 ground beef. Leaner beef like 90/10 makes dry, crumbly burgers that taste more like meatloaf. The 80/20 ratio gives you enough fat to keep things juicy and rich without being greasy. Ground chuck is perfect, or if you want to get a little fancier, ask for a chuck and sirloin blend. The chuck brings richness while sirloin adds a cleaner beef taste.
Quality matters here more than anywhere else in the recipe. You can have the best sauce and toppings in the world, but if your ground beef tastes bland or off, the whole burger suffers. Look for beef that’s bright red, not brown or gray. Check the sell-by date and try to use it within a day or two of buying for the freshest taste. Some butcher counters will even grind beef to order, which is the absolute best option if you can swing it. Never use frozen pre-made patties if you want restaurant-quality results.
Why your patty shape actually affects how it cooks
Here’s something most people mess up without realizing it. When you form your burger patties, make them slightly wider than your buns and press a shallow dent into the center of each one with your thumb. Burgers shrink when they cook, and they also puff up in the middle from the heat. That dimple in the center prevents the burger from turning into a rounded ball shape, giving you an even, flat patty that fits perfectly on the bun and cooks uniformly.
Aim for patties that are about three-quarters of an inch thick. Thinner than that and they dry out too easily. Thicker and the outside gets overdone before the inside cooks through. Use a light touch when shaping the patties and don’t pack the meat too tightly. Think of it like you’re gently forming it rather than compressing it. The looser texture allows the fat to render properly and keeps everything tender. If you’re making burgers ahead, you can freeze the formed patties with parchment paper between each one, then cook them straight from frozen with just a few extra minutes of cooking time.
Grilling versus stovetop changes the game
Grilling gives burgers that smoky, charred exterior that’s hard to beat, especially in summer. Preheat your grill on high, then reduce it to medium once you put the burgers on. This creates a good sear without burning the outside before the inside cooks. Close the lid and resist the urge to flip them more than once. Every time you flip, you lose heat and juices. About five minutes per side gets you to medium doneness, but adjust based on how thick your patties are and how done you like them.
For stovetop cooking, a cast-iron skillet is your best friend. Heat it over medium-high until it’s really hot, add just a tiny bit of oil, then place your patties in without crowding them. The key difference with stovetop burgers is you get better control over temperature but miss that smoky char. You can still get a great crust though. Whatever you do, don’t press down on the burgers with your spatula while they cook. People do this all the time and it just squeezes out all the juices that keep the burger moist.
When to add the cheese makes it melt perfectly
Timing the cheese addition is simpler than most people make it. After you flip the burger for its second side, immediately place your cheese slice on top. This gives the cheese the full cooking time on that second side to melt completely. If you’re grilling, close the lid to trap the heat and help it melt faster. For stovetop cooking, you can put a lid over the pan for the last minute or so. The cheese should be completely melted and starting to drape over the edges of the patty.
Cheddar is the classic choice, but you’ve got options. American cheese slices melt into that gooey, diner-style coating that some people love. Pepper jack adds a spicy kick. Gruyere brings a nutty, sophisticated taste if you’re feeling fancy. Whatever cheese you pick, make sure it’s something that melts well. Fresh mozzarella or crumbly cheeses like feta don’t work as well because they don’t create that melted blanket over the patty. One slice per burger is usually perfect, though if you really love cheese, nobody’s going to stop you from using two.
Caramelized onions take it from good to incredible
Raw onions on a burger are fine, but caramelized onions are what separate a good burger from one you’ll think about for days. The process takes about thirty minutes, but it’s mostly hands-off and you can make a big batch ahead. Slice onions thin, cook them low and slow in a bit of butter or oil, stirring occasionally. They’ll slowly turn golden brown and develop this sweet, rich taste that’s completely different from raw onions. The sugars in the onions caramelize and create these deep, complex notes.
You can make caramelized onions up to a week ahead and store them in the fridge, which makes them perfect for burger night. Just reheat them gently before serving. They also freeze really well, so some people make huge batches and freeze them in portions. A generous pile of caramelized onions on top of your cheese-covered patty adds a sweetness that balances the savory beef and tangy sauce perfectly. If thirty minutes sounds like too much work, regular grilled onion slices are still better than nothing, or thinly sliced raw red onions add a nice sharp bite.
The bun matters way more than people realize
A soggy or falling-apart bun ruins even the best burger. Hawaiian rolls or brioche buns are the top choices because they’re soft but sturdy enough to hold up to all the juices and sauce. Their slight sweetness also complements the savory burger really well. Whatever bun you choose, always toast it lightly. This creates a bit of a barrier that prevents the bun from getting soggy from all the burger juices and sauce. Just a minute on the grill or in a pan with the cut sides down does it.
Some people butter their buns before toasting for extra richness, which is definitely worth trying. The toasted bun should have some golden-brown spots but not be dried out or crunchy. If you’re serving burgers for a group, you can toast all the buns at once on a baking sheet in the oven at 350 degrees for about five minutes. Keep them warm wrapped in foil until you’re ready to assemble. The bottom bun takes more abuse from juices, so some people use the sturdier top bun on the bottom instead.
Assembly order actually affects how it tastes
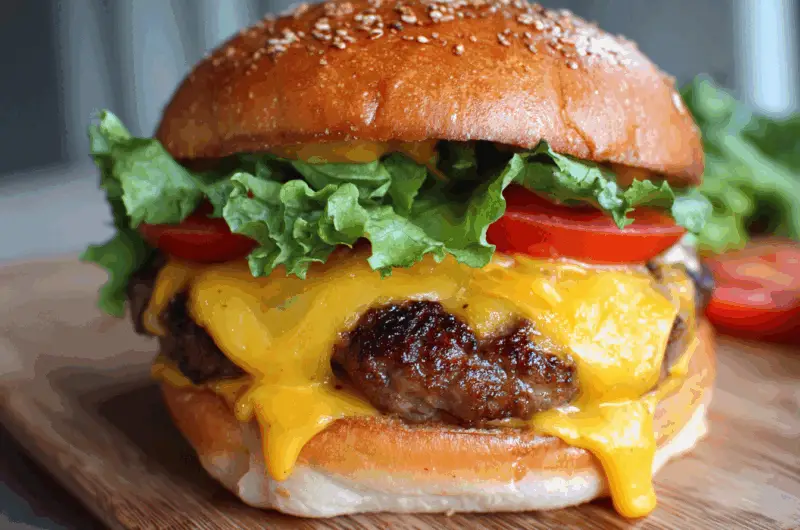
How you stack everything changes each bite. Sauce goes on both the top and bottom buns first, while they’re still warm from toasting. Then the bottom bun gets lettuce next. This creates a barrier between the bun and the hot, juicy patty, preventing sogginess. The burger patty with its melted cheese goes on top of the lettuce. Then comes your caramelized onions if you’re using them, followed by tomato slices on top. The top bun, already sauced, goes on last.
Some people put tomatoes on the bottom, but they’re watery and will make your bun soggy faster. Keeping them near the top helps. If you’re adding pickles, they can go either on the bottom with the lettuce or on top with the tomatoes. The assembly order might seem like overthinking, but it really does make a difference in how the burger holds together and how each bite tastes. Let the assembled burger rest for just a minute before eating. This lets everything settle and the bun soak up just a bit of those juices without getting destroyed.
Making amazing cheeseburgers at home really comes down to a few key moves that restaurants know but most home cooks skip. Season the meat properly with Worcestershire and spices, make that incredible secret sauce, use good quality beef with enough fat, form your patties right, and don’t forget to toast those buns. Add caramelized onions if you want to really impress people. Once you get these basics down, you’ll have burgers that honestly taste better than most restaurants, and everyone will be asking when you’re making them again.
Classic Cheeseburgers with Secret Sauce
Cuisine: American6
servings15
minutes35
minutes784
kcalJuicy homemade cheeseburgers with perfectly seasoned beef patties and an amazing secret sauce that beats any restaurant version.
Ingredients
2 pounds 80/20 ground beef
3 teaspoons garlic powder
2 tablespoons Worcestershire sauce
2 teaspoons mustard powder
2 teaspoons kosher salt, plus more for seasoning
1 teaspoon freshly cracked black pepper, plus more for seasoning
6 cheddar cheese slices
6 brioche or Hawaiian hamburger buns
6 Romaine lettuce leaves, torn
1 large tomato, sliced
1 cup caramelized onions (optional)
- Secret Sauce:
1 cup mayonnaise
2 tablespoons ketchup
1/2 teaspoon garlic powder
2 tablespoons pickle juice
1 teaspoon dried dill
2 teaspoons fresh lime juice
1 teaspoon smoked paprika
1/2 teaspoon cayenne pepper
1 teaspoon stone ground mustard
Directions
- In a small bowl, whisk together all the secret sauce ingredients: mayonnaise, ketchup, garlic powder, pickle juice, dried dill, lime juice, smoked paprika, cayenne pepper, and stone ground mustard. Mix until completely smooth and well combined. Cover the bowl and refrigerate while you prepare the burgers, allowing the ingredients to blend together.
- In a large bowl, combine the ground beef with garlic powder, Worcestershire sauce, mustard powder, salt, and black pepper. Using your hands, gently mix the seasonings into the beef until everything is evenly distributed throughout. Be careful not to overwork the meat as this can make the burgers tough and dense instead of tender.
- Divide the seasoned beef mixture into six equal portions. Gently form each portion into a patty about 3/4 inch thick and roughly 4.5 inches wide, making them slightly larger than your buns since they’ll shrink during cooking. Press a shallow indentation into the center of each patty with your thumb to prevent them from puffing up while grilling.
- Preheat your grill to high heat. Once hot, season both sides of the patties with additional salt and pepper. Place the patties on the grill, then reduce the heat to medium. Cover the grill and cook for 5 minutes without moving them, allowing a nice crust to form on the bottom.
- Flip the burgers and immediately top each patty with a slice of cheddar cheese. Continue cooking covered for another 3-5 minutes, depending on your desired level of doneness. The cheese should be completely melted and starting to drape over the edges of the patty when they’re ready.
- While the burgers finish cooking, place the buns cut-side down on the cooler part of the grill. Toast them for about 1 minute until they’re lightly golden with some char marks. Watch them carefully so they don’t burn. Remove the buns and burgers from the grill.
- Spread a generous amount of the secret sauce on both the top and bottom of each toasted bun. Place torn lettuce leaves on the bottom bun to create a barrier against the juicy patty. Add the cheese-topped burger patty on top of the lettuce.
- Top the burger with caramelized onions if using, followed by tomato slices. Place the top bun on and let the assembled burger rest for about a minute before serving. This allows the juices to settle and prevents the burger from falling apart when you bite into it. Serve immediately while hot.
Notes
- The secret sauce can be made up to 3 days ahead and stored covered in the refrigerator. The ingredients meld together even better over time.
- For stovetop cooking, heat a cast-iron skillet over medium-high heat and cook patties for about 4-5 minutes per side, adding cheese after flipping.
- Uncooked patties can be frozen for up to 3 months with parchment paper between each one. Thaw overnight in the refrigerator before cooking.
- Caramelized onions can be made up to a week ahead and refrigerated, or frozen for longer storage.
- Never press down on burgers while cooking as this squeezes out all the delicious juices that keep them moist.
Frequently asked questions
Q: Can I make these burgers ahead of time?
A: You can form the seasoned patties up to 24 hours ahead and keep them covered in the refrigerator, or freeze them for up to 3 months. The secret sauce also keeps well in the fridge for several days. Just cook the patties fresh when you’re ready to eat for the best results.
Q: What if I don’t have a grill?
A: A cast-iron skillet on the stovetop works great for these burgers. Heat it over medium-high heat until very hot, add a tiny bit of oil, and cook the patties for 4-5 minutes per side. You won’t get the smoky char from grilling, but you’ll still get a delicious crust.
Q: Can I use ground turkey or chicken instead of beef?
A: The recipe works with ground turkey or chicken, but use 85/15 or 93/7 blends since poultry is naturally leaner. You’ll need to cook them all the way through to 165 degrees for food safety, and they won’t be quite as juicy as beef burgers even with the Worcestershire sauce.
Q: Why do my burgers always fall apart on the grill?
A: This usually happens when the meat is too lean, the patties aren’t formed firmly enough, or you flip them too early before a crust forms. Use 80/20 ground beef, form the patties with a slightly firm touch, and wait a full 5 minutes before flipping for the first time.