
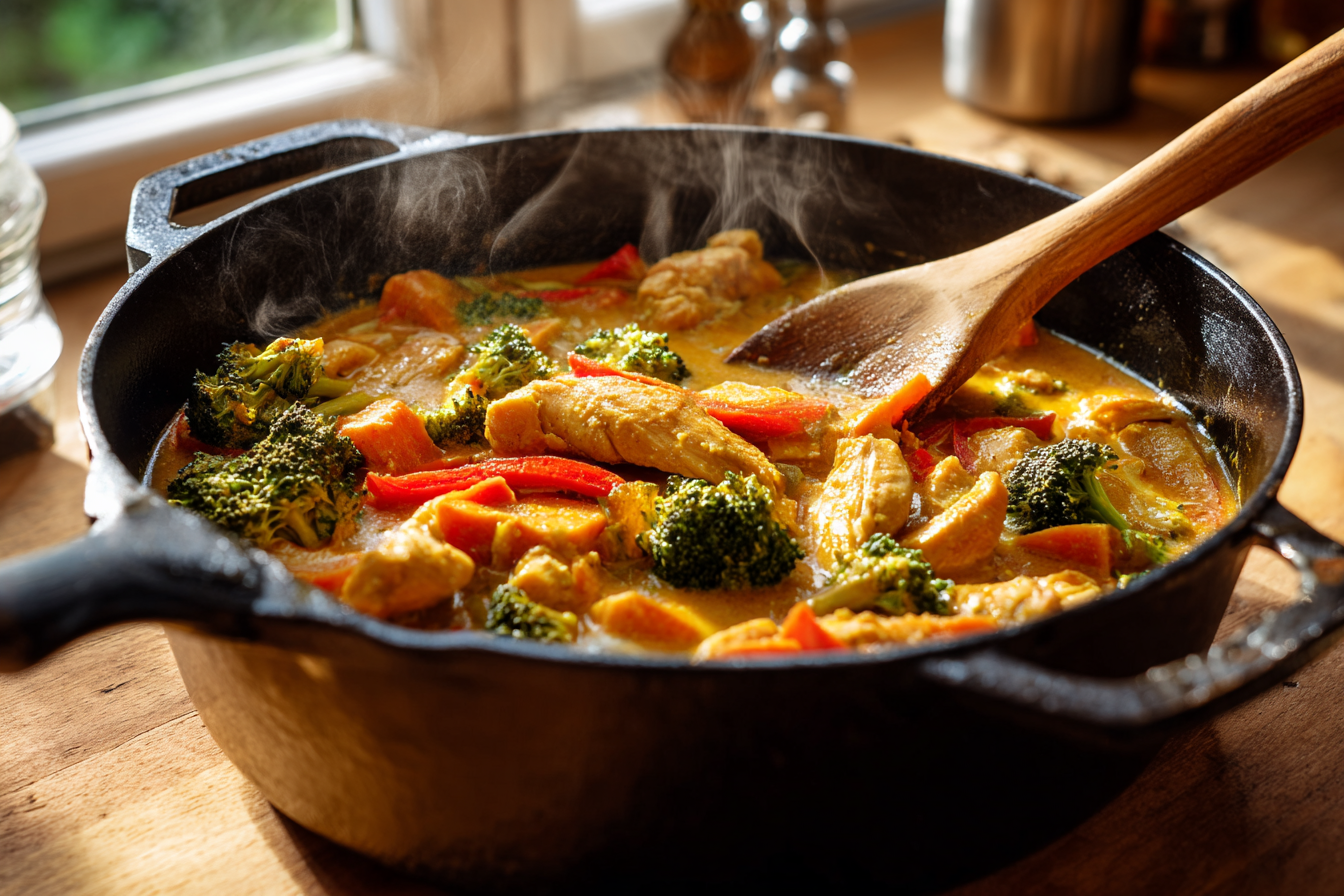
Making dinner on a busy weeknight can feel like a race against the clock, especially when you’re trying to put something tasty on the table without spending hours in the kitchen. That’s where this coconut curry chicken comes in. It’s one of those meals that tastes like you spent way more time on it than you actually did. The best part? Everything cooks in one pot, which means less cleanup and more time to relax after dinner. This recipe combines tender chicken, colorful vegetables, and a creamy coconut sauce that brings everything together in about 40 minutes.
Why one pot meals make weeknight cooking easier
Anyone who’s tackled dinner after a long day knows the struggle of dealing with multiple pots and pans. One pot meals solve that problem by letting you cook everything in a single pan or pot. This coconut curry chicken is perfect for this approach because you start by cooking the chicken, then add the vegetables, and finally simmer everything in coconut milk. The result is a dish where all the ingredients cook together and share their tastes, making the final meal way better than if you cooked everything separately.
The one pot method also means you’re building layers of taste as you go. When you brown the chicken first, it leaves little crispy bits on the bottom of the pan. Those bits get scraped up when you add liquid later, which adds more depth to your sauce. Plus, when you’re done eating, you only have one pot to wash instead of a sink full of dishes. That alone makes this cooking method worth trying on any busy evening.
Getting the most out of coconut milk
The coconut milk you find in cans is completely different from the stuff in the refrigerated section near the regular milk. Canned coconut milk is thick and rich, almost like heavy cream. When you open a can, you’ll often see it’s separated into thick cream on top and watery liquid below. That’s totally normal! Just stir it together before adding it to your curry. Using full-fat coconut milk gives you the creamiest results, though you can use lite versions if you want something less rich.
When shopping for coconut milk, look for brands that list just coconut and water as ingredients, maybe with guar gum as a thickener. Some brands add stabilizers or sweeteners you don’t need. The coconut milk creates the base of your curry sauce, and as it simmers with the curry powder and vegetables, it thickens up naturally. If your curry seems too thick, you can always add a splash of water or chicken broth to thin it out.
Choosing and preparing your vegetables
The vegetables in this curry are totally flexible based on what you have in your fridge. Traditional choices include bell peppers, onions, sweet potatoes, and broccoli. The key is cutting everything into similar-sized pieces so they cook evenly. Sweet potatoes take longer to cook than bell peppers, so you add them to the pot first and give them a head start. Broccoli and peppers go in later since they cook faster. This timing ensures everything finishes cooking at the same time.
Don’t throw away those broccoli stems! They’re actually really good in curry. Just slice them into thin rounds and toss them in with the florets. The stems have a mild, slightly sweet taste and add a nice crunch. Other vegetables that work well include cauliflower, snow peas, mushrooms, zucchini, or spinach. If you’re using mushrooms or spinach, add them near the end of cooking so they don’t get mushy. The vegetables should be tender but still have a little bite to them when you’re done.
Working with curry powder and spices
Curry powder isn’t just one spice – it’s a blend of several spices mixed together. Different brands have different combinations, which means they can vary in heat level and taste. Some are mild and earthy, while others pack more punch. Most curry powders contain turmeric, coriander, cumin, and sometimes chili powder or cayenne. When you first add curry powder to the hot pan, it gets toasted for about 30 seconds. This step wakes up the spices and makes them more intense.
Along with curry powder, this recipe uses fresh garlic and ginger. Don’t skip these two ingredients! They add so much to the final dish. Peel and mince the garlic, and grate the ginger using a small grater or the small holes on a box grater. If you don’t have fresh ginger, you can use ground ginger instead, but use less since ground spices are more concentrated. Red curry paste is another ingredient that brings authentic Thai taste to the dish. You’ll find it in the Asian food section at most grocery stores.
Cooking the chicken properly
Chicken breast works great for curry because it cooks quickly and soaks up all the sauce. Cut the chicken into bite-sized pieces about one inch across. Try to make them roughly the same size so they cook at the same rate. When you add the chicken to the hot pan with the toasted spices, it gets coated in all that good stuff right away. Brown the chicken for about five to seven minutes, stirring occasionally. The outside should look golden and cooked, but the inside doesn’t need to be fully done yet since it’ll keep cooking later.
After browning, you’ll remove the chicken from the pan and set it aside while you cook the vegetables. This prevents the chicken from overcooking and getting tough. When you add it back to the curry later, it’ll finish cooking gently in the simmering coconut milk. If you prefer dark meat, chicken thighs work just as well and stay even more tender. You can also slice the chicken thinly against the grain before cooking, which helps it cook faster and makes it easier to eat. Save any juices that collect from the resting chicken and add them back to the pot for extra taste.
Building the sauce base
After the vegetables have softened, it’s time to build the curry sauce. This is where everything comes together. Pour in the coconut milk and stir it around, scraping up any brown bits stuck to the bottom of the pan. Those bits are pure gold – they add so much depth to your sauce. Add the red curry paste and tomato paste at this point. The tomato paste might seem like an odd addition, but it adds a subtle richness and helps thicken the sauce. Stir everything together until the pastes are completely mixed in.
Return the browned chicken to the pot along with any accumulated juices. Add the remaining curry powder and cayenne pepper if you want some heat. Let everything simmer together on low heat for about five to ten minutes. The sauce will thicken as it simmers, and the chicken will finish cooking through. Don’t cover the pot during this time unless you want a thinner sauce. The open simmering helps concentrate the sauce and makes it nice and creamy. Stir occasionally to prevent anything from sticking to the bottom.
What to serve with your curry
Curry begs to be served over something that can soak up all that amazing sauce. White jasmine rice is the traditional choice and it’s perfect for this. The rice catches all the coconut curry sauce and makes every bite satisfying. Cook your rice while the curry simmers so everything’s ready at the same time. Brown rice works too if you prefer it, though it takes longer to cook. Cauliflower rice is another option if you’re looking for something lighter or want to skip grains altogether.
Quinoa makes a good base as well and adds some protein to your meal. Whatever you choose to serve underneath, don’t forget the toppings! Fresh cilantro and lime wedges are traditional and really brighten up the dish. Squeeze some lime juice over your serving right before eating – the acidity cuts through the richness of the coconut milk and makes everything taste fresher. Some people like to add sliced green onions or fresh basil too. A side of naan bread or plain yogurt on the side can help cool things down if your curry turned out spicier than expected.
Making curry ahead and storing leftovers
Curry is one of those dishes that actually gets better after sitting for a while. The spices have more time to blend together and the vegetables soak up more of the sauce. You can make this curry a day ahead and just reheat it when you’re ready to eat. Store it in an airtight container in the fridge for up to four or five days. When reheating, you might need to add a splash of water or coconut milk since the sauce thickens as it sits in the fridge.
This curry also freezes really well, which makes it perfect for meal prep. Let it cool completely before transferring it to freezer-safe containers. It’ll keep in the freezer for up to three months. Thaw it overnight in the fridge before reheating. You can reheat curry in the microwave or on the stovetop over medium-low heat. If you’re reheating on the stove, stir it occasionally and add liquid if needed to prevent sticking. The vegetables might get a bit softer after freezing and reheating, but the taste stays just as good.
Adjusting spice levels to your preference
Not everyone likes the same amount of heat in their food. The great thing about making curry at home is you can control exactly how spicy it gets. The cayenne pepper in this recipe adds a kick, but it’s totally optional. If you’re sensitive to spice, leave it out completely. The curry will still have plenty of taste from the curry powder and other seasonings. Red curry paste varies in heat level between brands too. Thai Kitchen is a common brand that’s relatively mild, while others can be much spicier.
Start with the amount called for in the recipe, then taste the curry before serving. You can always add more spice, but you can’t take it away once it’s in there. If your curry ends up too spicy, there are ways to tone it down. Adding more coconut milk will dilute the heat. A spoonful of sugar or honey can also help balance out spiciness. Serving the curry with plain yogurt or sour cream on the side gives people a cooling element to mix in. Some folks like to keep hot sauce or chili flakes on the table so everyone can adjust their own serving to their taste.
This coconut curry chicken brings together simple ingredients in a way that feels special without being complicated. The combination of tender chicken, vegetables, and creamy coconut sauce makes it satisfying enough to serve to guests, yet easy enough to throw together on a random Tuesday night. Once you make it a few times, you’ll probably start changing it up based on what’s in your fridge, and that’s exactly how curry should be – flexible and forgiving.
Coconut Curry Chicken With Tender Vegetables
Cuisine: Thai4
servings10
minutes30
minutes230
kcalCreamy coconut chicken curry loaded with colorful vegetables and aromatic spices, ready in just 40 minutes using one pot.
Ingredients
1 tablespoon coconut oil
1 1/2 tablespoons curry powder, divided
1/2 tablespoon ground turmeric
2 cloves garlic, minced
1 tablespoon grated fresh ginger
1 pound chicken breast, cut into 1-inch pieces
1 cup diced onion
2 cups cubed sweet potato
2 cups julienned bell peppers
3 cups broccoli florets
1 can (13.5 oz) full-fat coconut milk
1 tablespoon Thai red curry paste
1 tablespoon tomato paste
1/2 teaspoon cayenne pepper (optional)
Salt and pepper to taste
Cooked rice, cilantro, and lime wedges for serving
Directions
- Heat a large Dutch oven or nonstick pot over medium heat and add the coconut oil. Let it heat for about 30 seconds until shimmering. Add 1 tablespoon of curry powder, the turmeric, minced garlic, and grated ginger to the hot oil. Stir constantly for about 30 seconds until the spices become fragrant and the garlic starts to turn golden, being careful not to let the garlic burn.
- Add the chicken pieces to the pot along with a good pinch of salt and pepper. Stir everything together to coat the chicken in the toasted spices. Cook for 5 to 7 minutes, stirring occasionally, until the chicken is browned on the outside but doesn’t need to be fully cooked through yet. If spices start sticking to the bottom of the pan, add a splash of water or broth. Remove the chicken from the pot and set it aside on a plate.
- Add the diced onion and cubed sweet potato to the same pot with some salt and pepper. Stir to combine and cover with a lid. Cook for 5 to 7 minutes, stirring once or twice, until the sweet potatoes start to soften. Use a splash of broth or water to scrape up any brown bits stuck to the bottom of the pan, as these add great taste to the final dish.
- Add the sliced bell peppers and broccoli florets to the pot. Cover again with the lid and cook for another 3 to 5 minutes, stirring occasionally, until the vegetables are starting to become tender but still have some firmness to them.
- Pour in the coconut milk, stirring to help it melt if it’s solidified in the can. Add the red curry paste, tomato paste, remaining 1/2 tablespoon of curry powder, cayenne pepper if using, and more salt and pepper to taste. Stir everything together until the pastes are fully incorporated into the coconut milk and no lumps remain.
- Return the browned chicken to the pot along with any juices that have collected on the plate. Stir to combine everything and bring the curry to a gentle simmer. Let it simmer uncovered over medium-low heat for 5 to 10 minutes, stirring occasionally, until the vegetables are cooked to your liking and the chicken is fully cooked through. The sauce will thicken as it simmers.
- Turn off the heat and taste the curry, adjusting salt and pepper as needed. If you want your curry more saucy, stir in a splash of water or additional coconut milk to reach your desired consistency.
- Serve the curry over cooked jasmine rice or cauliflower rice. Garnish each serving with fresh cilantro and lime wedges on the side so everyone can squeeze fresh lime juice over their portion right before eating.
Notes
- You can substitute chicken thighs for chicken breasts if you prefer dark meat. The cooking time remains the same.
- Feel free to swap vegetables based on what you have available. Cauliflower, zucchini, snow peas, mushrooms, or spinach all work well in this curry.
- For a milder curry, reduce or omit the cayenne pepper and use less red curry paste. Start with half the amount and add more to taste.
- Ground ginger can replace fresh ginger in a pinch. Use about 1 teaspoon of ground ginger instead of the tablespoon of fresh.
- Leftovers keep well in the fridge for up to 5 days and can be frozen for up to 3 months. The sauce may thicken when refrigerated, so add a splash of water when reheating.
Frequently asked questions
Q: Can I make this curry without coconut milk?
A: Coconut milk is really what makes this dish creamy and gives it that signature curry taste. You could try using heavy cream instead, but the result will taste quite different and won’t have that coconut base. If you’re avoiding coconut, a different type of curry recipe might work better for you.
Q: How can I make this curry spicier?
A: There are several ways to add more heat. Increase the cayenne pepper, add fresh sliced Thai chilis when you cook the onions, or use a spicier curry paste. You can also serve hot sauce or chili oil on the side so people can add their own heat level.
Q: What if my curry sauce is too thin?
A: Let it simmer uncovered for a few extra minutes to thicken naturally. You can also mix a teaspoon of cornstarch with a tablespoon of cold water and stir it into the simmering curry. Another option is to mash some of the cooked sweet potato pieces against the side of the pot, which will help thicken the sauce naturally.
Q: Can I use frozen vegetables in this recipe?
A: Yes, frozen vegetables work fine. Just add them directly to the curry without thawing first. They might release some extra water as they cook, so you may need to simmer the curry a bit longer to thicken the sauce. Frozen broccoli, bell peppers, and snap peas all work well.