
There’s something magical about walking into a kitchen where soup has been simmering for hours. The warm, comforting smell that fills the air takes you back to childhood memories of your grandmother’s cooking. Yet somehow, many of these precious recipes have been lost to time, replaced by quick fixes and instant versions that just don’t compare to the original.
Most people rush the cooking process
The biggest mistake home cooks make today is trying to speed up what was never meant to be rushed. Grandma’s soup wasn’t made in 30 minutes like those recipe websites promise. It took time, patience, and understanding that good things come to those who wait. The magic happened during those long, slow hours of simmering.
When you rush soup, you miss out on the deep, rich taste that only comes from allowing ingredients to slowly release their essence into the broth. Traditional cooking methods required at least two hours of gentle simmering. This wasn’t because our grandmothers had nothing better to do – it was because they understood that time was the secret ingredient that made their soup unforgettable.
People skip the foundation vegetables
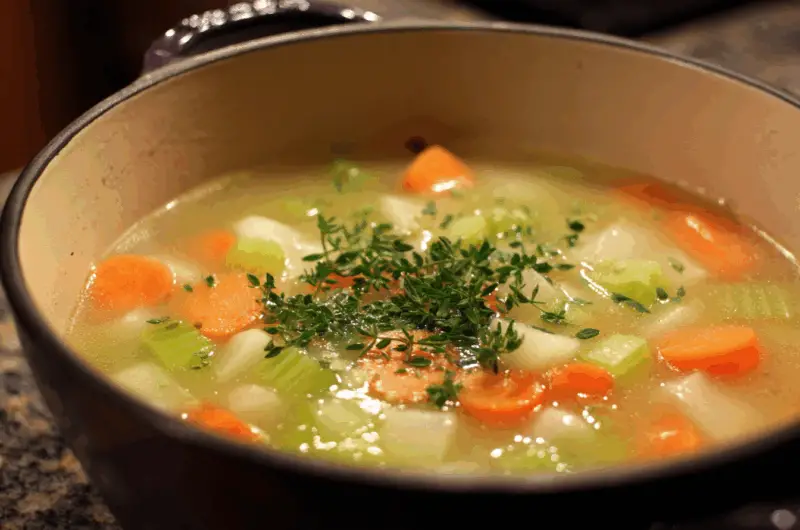
Too many cooks today think they can just dump everything into a pot and call it soup. But grandma knew better. She always started with what the French call mirepoix – a combination of diced onions, carrots, and celery. This holy trinity of vegetables forms the backbone of any great soup, providing layers of taste that can’t be replicated with shortcuts.
The key was sautéing these vegetables first, not just throwing them into cold broth. This step releases their natural sugars and creates a sweet, aromatic base that transforms ordinary water and vegetables into something extraordinary. Proper preparation of these foundation vegetables was non-negotiable in traditional kitchens, yet modern recipes often skip this crucial step entirely.
Nobody makes their own broth anymore
Walk down any grocery store aisle and you’ll find dozens of boxed broths promising restaurant-quality results. But ask any grandmother, and she’ll tell you that store-bought broth is just salty water compared to the real thing. Homemade broth was the soul of her soup, made from bones, vegetable scraps, and whatever odds and ends needed using up.
Making broth from scratch meant saving chicken bones, beef bones, and vegetable scraps throughout the week. Nothing went to waste in grandmother’s kitchen. The broth would simmer for hours, sometimes overnight, creating a rich, gelatinous liquid that added body and depth to every spoonful. Even if you can’t make your own broth, choosing a high-quality store-bought version makes a noticeable difference in the final result.
Modern cooks over-complicate simple recipes
Today’s recipes often read like chemistry experiments with dozens of ingredients and complicated techniques. But grandmother’s soup was beautiful in its simplicity. She used what she had on hand – basic vegetables, good broth, simple seasonings, and time. The magic wasn’t in exotic ingredients or fancy equipment; it was in understanding how simple ingredients work together.
This approach meant that no two pots of soup were exactly alike. If carrots were particularly sweet that week, she’d use more. If the celery was a bit tough, she’d cook it longer. The recipe was more of a guideline than a rigid formula, allowing the cook to adjust based on what was available and what tasted right. This flexibility is something modern cooks often struggle with, preferring exact measurements to intuitive cooking.
Seasoning happens at the wrong time
Many people think seasoning is something you do at the end of cooking, but grandmother knew better. She seasoned in layers, adding salt and pepper at different stages to build complex taste throughout the cooking process. This technique allows each layer of seasoning to penetrate the ingredients rather than just sitting on top.
The first seasoning happened when she sautéed the vegetables, helping them release their natural moisture and concentrate their essence. More seasoning went in with the broth, and final adjustments were made at the end. Traditional seasoning methods also relied heavily on dried herbs like thyme, which grandmother added early in the cooking process to allow their oils to infuse throughout the soup.
The art of slow simmering gets ignored
There’s a big difference between boiling and simmering, and grandmother understood this distinction perfectly. Boiling creates turbulence that can make vegetables mushy and broth cloudy. Simmering, on the other hand, creates gentle movement that allows ingredients to cook evenly while maintaining their texture and releasing maximum taste into the liquid.
The ideal simmer produces just a few bubbles breaking the surface every few seconds. This gentle heat allows tough vegetables to soften gradually while preventing delicate ingredients from falling apart. It also allows the broth to reduce slowly, concentrating its taste without becoming overly salty or bitter. This patient approach to cooking is what separated grandmother’s soup from everything else.
People forget about the finishing touches
A great soup isn’t just about what goes into the pot – it’s also about how it’s served. Grandmother understood that presentation mattered, even for simple family meals. She might add a sprinkle of fresh herbs, a dollop of sour cream, or a handful of crackers to transform a humble soup into something special.
The bread served alongside was just as important as the soup itself. Whether it was homemade rolls, crusty French bread, or simple saltines, the right accompaniment could turn soup from a light snack into a satisfying meal. These finishing touches didn’t cost much, but they showed care and attention to detail that made even simple food feel like a celebration.
Storage and reheating methods matter
Grandmother’s soup often tasted even better the next day, but this wasn’t by accident. She knew how to store and reheat soup properly to maintain its texture and taste. Soup was always cooled completely before going into the refrigerator, and it was reheated slowly over low heat rather than zapped in the microwave.
She also understood that some soups freeze beautifully while others don’t. Broth-based soups with vegetables freeze well, but cream-based soups can separate when thawed. When reheating, she’d add a splash of fresh broth or water if the soup had thickened too much, and she’d taste and adjust the seasoning since refrigeration can dull some spices.
The recipe adapts to what’s available
Perhaps the most important lesson from grandmother’s soup was its flexibility. The basic recipe served as a foundation, but it changed based on what was in season, what was on sale, or what needed to be used up before it spoiled. This adaptability meant that families could eat well even when money was tight or certain ingredients weren’t available.
Winter soups might include hearty root vegetables and preserved herbs, while summer versions featured fresh tomatoes and garden vegetables. Leftover meat from Sunday dinner could transform a simple vegetable soup into a hearty main course. This flexibility not only prevented waste but also kept meals interesting and varied throughout the year, something that rigid modern recipes often fail to achieve.
The beauty of grandmother’s soup lies not in exotic ingredients or complicated techniques, but in understanding how simple elements work together when given time and attention. These recipes survived because they were practical, economical, and deeply satisfying. By returning to these basic principles, modern cooks can create soups that nourish both body and soul, connecting us to generations of home cooks who understood that the best meals come from the heart.
Grandmother’s Lost Soup Recipe
Cuisine: Comfort Food4
servings15
minutes2
minutes180
kcalA timeless, comforting soup that brings generations together with simple ingredients and traditional cooking methods.
Ingredients
1 large onion, diced
2 large carrots, diced
3 stalks celery, diced
4 cloves garlic, minced
2 tablespoons olive oil
6 cups good quality broth (chicken or vegetable)
1 teaspoon dried thyme
Salt and black pepper to taste
2 tablespoons fresh parsley, chopped (optional)
Directions
- Heat olive oil in a large, heavy-bottomed pot over medium heat. The oil should shimmer but not smoke. Add the diced onion and cook for 3-4 minutes until it begins to soften and become translucent. Season lightly with salt and pepper.
- Add the diced carrots and celery to the pot with the onions. Cook for 5-7 minutes, stirring occasionally, until the vegetables begin to soften. The carrots should start to lose their raw edge and the celery should become slightly tender. Add the minced garlic and cook for another minute until fragrant.
- Pour in the broth slowly, scraping up any browned bits from the bottom of the pot with a wooden spoon. Add the dried thyme and bring the mixture to a gentle boil over medium-high heat. Once boiling, reduce the heat to low and season with salt and pepper to taste.
- Allow the soup to simmer uncovered for 1.5 to 2 hours, stirring occasionally. The soup should bubble gently with just a few bubbles breaking the surface every few seconds. The liquid will reduce slightly, concentrating the flavors and creating a rich, aromatic broth.
- During the last 30 minutes of cooking, taste the soup and adjust seasoning as needed. The vegetables should be tender but not mushy, and the broth should be rich and flavorful. Add more salt, pepper, or thyme if desired.
- Remove the soup from heat and let it rest for 5 minutes before serving. This allows the flavors to settle and the temperature to become more comfortable for eating. Ladle into bowls and garnish with fresh chopped parsley if desired.
- Serve hot with crusty bread, crackers, or rolls. The soup can be stored in the refrigerator for up to 3 days or frozen for up to 3 months. When reheating, do so slowly over low heat and add a splash of broth if the soup has thickened too much.
- For variations, feel free to add other vegetables like potatoes, green beans, or peas during the last hour of cooking. Leftover cooked chicken, beef, or beans can also be added to make the soup more hearty and filling.
Notes
- This soup tastes even better the next day as the flavors continue to meld together
- Use the best quality broth you can find or make your own for superior results
- The soup can be customized with seasonal vegetables or whatever you have on hand
- For a heartier version, add cooked pasta, rice, or beans during the last 15 minutes of cooking
- Avoid boiling the soup vigorously as this can make vegetables mushy and broth cloudy
Frequently Asked Questions
Q: Can I make this soup in a slow cooker instead of on the stovetop?
A: Absolutely! After sautéing the vegetables on the stovetop, transfer everything to a slow cooker and cook on low for 6-8 hours or high for 3-4 hours. The long, gentle cooking will produce similar results to the traditional stovetop method.
Q: What’s the best way to store leftover soup?
A: Cool the soup completely before storing it in the refrigerator for up to 3 days or freezer for up to 3 months. When reheating, do so slowly over low heat and add extra broth if it has thickened too much during storage.
Q: Can I add meat to this vegetable soup?
A: Yes! Leftover cooked chicken, beef, or turkey can be added during the last 30 minutes of cooking. If using raw meat, brown it first before adding the vegetables, then proceed with the recipe as written.
Q: Why does my soup taste bland compared to grandmother’s version?
A: The most common issues are using low-quality broth, not seasoning in layers throughout the cooking process, and rushing the simmering time. Make sure to use good broth, season at multiple stages, and allow the full 2-hour simmer time for maximum flavor development.