
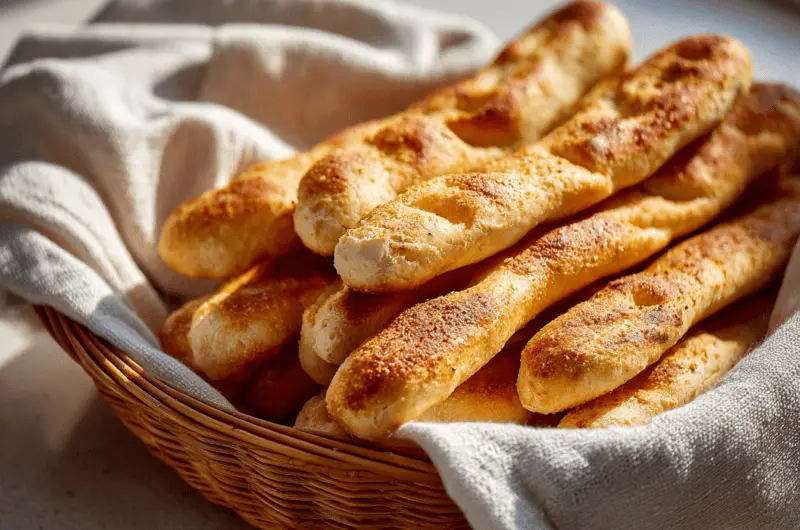
Ever been to Olive Garden and found yourself secretly wishing they’d just bring out more breadsticks and forget the actual meal? You’re not alone. Those warm, buttery, garlicky sticks of pure comfort have become more famous than anything else on the menu. The good news is you can make them at home, and they’re actually pretty simple. With just seven basic ingredients and no fancy equipment, you can have unlimited breadsticks whenever you want. The even better news? Homemade versions taste fresher and have that just-baked warmth that makes them almost impossible to stop eating.
Getting the ingredients right makes all the difference
The ingredient list for these breadsticks won’t break the bank or send you hunting through specialty stores. You need warm water, instant yeast, sugar, butter, salt, and bread flour. That’s it. The warm water should be between 100-110°F, which feels like a warm bath on your wrist. Too hot and you’ll kill the yeast, too cold and nothing will happen. The sugar isn’t there to make the breadsticks sweet, it actually feeds the yeast and helps create that soft, tender texture everyone loves.
Bread flour is the secret weapon here. It has more protein than regular all-purpose flour, which means your breadsticks will have that perfect chewy texture instead of being too soft and cake-like. If you can’t find bread flour, all-purpose works in a pinch, but you’ll need to knead the dough a bit longer. The instant yeast, sometimes called rapid rise yeast, saves you a step because you can mix it right in with everything else. No waiting around for it to bubble up in a separate bowl. Using the right measurements matters more than you’d think, so a kitchen scale really helps if you have one.
Mixing and kneading takes less effort than you think
A stand mixer with a dough hook makes this job super easy, but you can absolutely do it by hand if that’s all you’ve got. Mix the warm water, yeast, sugar, melted butter, and salt in a large bowl. Then gradually add the flour while stirring. The dough will look shaggy at first, but that’s normal. Once it comes together, you knead it for about 10 minutes by machine or 15-20 minutes by hand. Your arms might get tired, but think of it as a free workout. The dough is ready when it’s smooth, elastic, and slightly tacky but not sticky.
There’s a neat trick called the windowpane test to check if you’re done kneading. Take a small piece of dough and gently stretch it between your fingers. If you can stretch it thin enough to see light through it without it tearing, the gluten has developed properly and you’re good to go. If it tears right away, keep kneading for another minute or two. Once the dough passes the test, shape it into a ball and put it in a lightly oiled bowl. Cover it with plastic wrap or a clean towel and let it rest in a warm spot. The dough needs time to rise until it doubles in size, which usually takes about an hour to an hour and a half.
Shaping the breadsticks is easier than rolling out cookies
Once your dough has puffed up nice and big, punch it down gently to deflate it. This isn’t an anger management exercise, just a firm press with your fist to release the air bubbles. Turn the dough out onto a clean counter without any flour on it. The slight stickiness helps you roll the breadsticks into shape. Use a bench scraper or knife to divide the dough into 12 equal pieces. If you want to be precise, weigh each piece on your kitchen scale. They should be about 57 grams each, but eyeballing it works fine too.
Roll each piece of dough into a log about 8 inches long. Use your palms and roll back and forth on the counter like you’re making a snake out of Play-Doh. Don’t stress if they’re not perfect cylinders. A little character makes them look more homemade and authentic. Place them on a parchment-lined baking sheet about 2 inches apart so they have room to expand. Cover them loosely with a towel or plastic wrap and let them rise again for another hour or so. This second rise is what gives the breadsticks that fluffy, pillowy interior everyone goes crazy for.
The garlic butter topping is what makes them legendary
While the breadsticks are rising for the second time, make the garlic butter that takes these from good to absolutely irresistible. Melt 2 tablespoons of butter and mix it with garlic powder and a pinch of salt. Some people use fresh minced garlic, but garlic powder actually gives you that classic Olive Garden taste. Fresh garlic can burn in the oven and turn bitter, while garlic powder stays mellow and spreads more evenly. The smell alone will have everyone wandering into the kitchen asking when dinner’s ready.
The key to getting that butter to soak in properly is brushing it on at the right times. You’ll brush the breadsticks once right before they finish baking, and again the second they come out of the oven. That double coating ensures every bite is buttery and garlicky. Don’t be shy with the butter brush. This isn’t the time to worry about being too generous. The butter seeps into all the little nooks and crannies, creating that signature soft crust that makes these breadsticks so addictive. Keep a little extra garlic butter on hand because you’ll probably want to brush on more when you reheat leftovers.
Baking temperature and timing need some attention
Preheat your oven to 400°F before the breadsticks finish their second rise. Some recipes suggest baking at higher temperatures, but 400°F gives you a nice golden crust without drying out the inside. The total baking time is only 12-14 minutes, so don’t wander off to fold laundry or scroll through your phone. These go from perfect to overdone pretty quickly. After about 5 minutes in the oven, pull them out and brush with half of your garlic butter, then pop them back in for another 6-8 minutes.
Watch for the breadsticks to turn light golden brown on top. They’ll continue cooking a tiny bit after you take them out, so pull them when they’re just starting to color. As soon as they’re out of the oven, brush them immediately with the remaining garlic butter. The heat helps the butter melt right into the bread. Sprinkle a little extra salt and garlic powder on top if you want. The smell at this point is absolutely mouthwatering. Let them cool for maybe two minutes if you can wait that long, then serve them warm. They’re best eaten fresh, but they reheat pretty well in a 425°F oven for just a few minutes.
Making them ahead saves time on busy nights
Nobody wants to spend three hours making bread on a random Tuesday night. The good news is you can prep these breadsticks ahead of time in a couple different ways. After you shape the dough into logs, you can cover them tightly and stick them in the fridge for up to 24 hours. The cold slows down the yeast, so the dough rises much more slowly. When you’re ready to bake, take them out and let them come to room temperature while your oven preheats. If they haven’t doubled in size yet, give them a bit more time on the counter.
For longer storage, freeze the shaped breadsticks on a baking sheet until they’re solid, then transfer them to a freezer bag. They’ll keep for up to two months this way. When you want fresh breadsticks, just put the frozen ones on a baking sheet and let them thaw and rise at room temperature. This usually takes a couple hours. You can also freeze the baked breadsticks after they’ve cooled completely. Wrap them well in foil and freeze in an airtight container. Reheat them straight from frozen in a 425°F oven for about 5 minutes. Brush them with fresh garlic butter when you reheat and they taste like you just made them.
What to serve alongside these breadsticks
These breadsticks are the perfect side for basically any Italian meal, but they also work with soups, salads, and pasta dishes from other cuisines too. A big bowl of marinara sauce for dipping is classic, but they’re also amazing with Alfredo sauce, cheese dip, or even just olive oil with herbs. If you’re making soup for dinner, these breadsticks turn it into a complete meal. They’re particularly good with creamy soups like chicken gnocchi or zuppa toscana. The soft, chewy texture soaks up broth perfectly.
They also make a great addition to a salad dinner. The combination of a crisp, fresh salad with warm, buttery breadsticks hits all the right notes. Some people serve them with lasagna or spaghetti, though honestly they’re so filling you might not need much else. Kids absolutely love these breadsticks, which makes them perfect for family dinners where you need something everyone will actually eat. They’re also impressive enough to serve when you have company over. Nobody needs to know how simple they actually are to make. The best part is watching people reach for their second or third one without even realizing it.
Common mistakes to avoid when making breadsticks
The biggest mistake people make is using water that’s too hot. If your water is over 120°F, it’ll kill the yeast and your dough won’t rise at all. You’ll end up with flat, dense breadsticks that nobody wants to eat. Test the water on your wrist like you would for a baby’s bottle. It should feel warm but not uncomfortable. Another common problem is adding too much flour. When you measure flour by scooping your measuring cup directly into the bag, you pack it down and end up with way more flour than the recipe intends. This makes dry, tough breadsticks instead of soft ones.
Not kneading the dough enough is another issue. If you skip out on kneading time, the gluten doesn’t develop properly and your breadsticks won’t hold their shape. They’ll spread out flat on the baking sheet instead of staying tall and cylindrical. On the flip side, over-baking them is easy to do if you’re not paying attention. They go from golden to too dark in just a minute or two, so set a timer and actually check on them. Finally, don’t skip the garlic butter. It’s not just for show, it actually keeps the breadsticks moist and adds most of the taste. Plain breadsticks without the butter topping are just okay, but with it they’re restaurant quality.
Why homemade beats the restaurant version
Making breadsticks at home means you control exactly what goes into them and when they’re served. At Olive Garden, the breadsticks come out when they come out, and sometimes they’ve been sitting under a heat lamp for who knows how long. When you make them yourself, you get to eat them fresh from the oven when they’re at their absolute best. The texture is softer, the garlic butter is more generous, and there’s no limit on how many you can have. Plus you save a bunch of money compared to ordering them for takeout or buying the frozen ones from the grocery store.
You can also adjust the recipe to your preferences. Want more garlic? Add it. Like them extra buttery? Go for it. Some people even add grated Parmesan cheese or Italian herbs to the butter mixture. You can make them slightly bigger or smaller depending on what you’re serving them with. The satisfaction of making something from scratch that tastes better than the restaurant version is pretty great too. Once you realize how easy these are, you’ll probably start making them regularly. They’re also a fun recipe to make with kids since the shaping part is easy and they get to see the dough rise like a science experiment.
Making Olive Garden breadsticks at home is one of those recipes that seems intimidating until you actually try it. The ingredient list is short, the steps are straightforward, and the results are consistently good even for beginners. With a little planning ahead, you can have fresh breadsticks ready whenever you want them. Once you make these a few times, you’ll have the process down and they’ll become one of those reliable recipes you turn to again and again.
Copycat Olive Garden Breadsticks
Cuisine: Italian12
breadsticks30
minutes14
minutes225
kcalButtery, garlicky breadsticks that taste even better than the restaurant version and take less than three hours from start to finish.
Ingredients
1 cup plus 2 tablespoons (250 grams) warm water, about 100-110°F
1 1/2 teaspoons instant yeast
2 tablespoons (25 grams) granulated sugar
3 tablespoons (42 grams) unsalted butter, melted
1 3/4 teaspoons fine sea salt
3 cups (381 grams) bread flour, plus more as needed
2 tablespoons (28 grams) unsalted butter, melted for topping
1/2 teaspoon kosher salt for topping
1/4 teaspoon garlic powder for topping
Directions
- Line two baking sheets with parchment paper and set them aside. In the bowl of a stand mixer fitted with the dough hook attachment, combine the warm water, instant yeast, sugar, melted butter, and salt. Stir briefly to mix the ingredients together.
- Begin adding the bread flour gradually while running the mixer on low speed. Once the flour is mostly incorporated, increase the speed to medium and knead for about 10-15 minutes until the dough is tacky and very elastic. If the dough seems extremely sticky, add more flour one tablespoon at a time until it reaches the right consistency.
- Remove the dough from the mixer and shape it into a ball. Place it in a lightly oiled bowl, turning once to coat all sides with oil. Cover the bowl with plastic wrap or a clean kitchen towel and let it rise in a warm, draft-free location until doubled in size, about 1 to 1 1/2 hours depending on your kitchen temperature.
- Once the dough has doubled in size, punch it down gently to deflate it. Turn it out onto a clean, unfloured work surface and divide it into 12 equal portions using a bench scraper or knife. For accuracy, you can weigh each piece to approximately 57 grams.
- Roll each piece of dough into an 8-inch log by rolling it back and forth under your palms on the counter. Place the shaped breadsticks on your prepared parchment-lined baking sheets, spacing them about 2 inches apart. Cover them loosely with plastic wrap or a kitchen towel and let them rise until doubled in size, about 1 to 1 1/2 hours.
- Preheat your oven to 400°F. While the oven is heating, prepare the garlic butter topping by melting the 2 tablespoons of butter and mixing it with the garlic powder and kosher salt in a small bowl.
- Bake the breadsticks for 5 minutes, then remove them from the oven and brush with half of the garlic butter mixture. Return them to the oven and continue baking for another 6-8 minutes until they’re golden brown on top. Watch them carefully during the last few minutes to prevent over-browning.
- Remove the breadsticks from the oven immediately and brush them with the remaining garlic butter while they’re still hot. Let them cool for just a minute or two, then serve warm. Store any leftovers in an airtight container for up to 3 days and reheat in a 425°F oven for 4-5 minutes.
Notes
- If you only have active dry yeast instead of instant yeast, you can use it at a 1:1 ratio, but the dough will take about 20% longer to rise.
- To make ahead, shape the breadsticks and refrigerate them covered for up to 24 hours, then bring to room temperature before baking.
- You can freeze shaped unbaked breadsticks for up to 2 months, or freeze baked breadsticks for up to 2 months and reheat from frozen.
- If using all-purpose flour instead of bread flour, your breadsticks will be slightly softer and less chewy, but still delicious.
- For vegan breadsticks, readers have had success using plant-based butter sticks or olive oil in the dough and vegan butter for the topping.
Frequently asked questions
Q: Can I make these breadsticks without a stand mixer?
A: Yes, you can absolutely knead the dough by hand. It will take about 15-20 minutes of kneading instead of 10 minutes in a mixer, but the results are just as good. Just be prepared for a bit of an arm workout.
Q: Why did my breadsticks turn out flat instead of fluffy?
A: This usually happens because the water was too hot and killed the yeast, the dough wasn’t kneaded long enough to develop gluten, or the breadsticks didn’t get enough time to rise before baking. Make sure your water is between 100-110°F and give the dough plenty of time to double in size during both rising periods.
Q: Can I use garlic salt instead of garlic powder and separate salt?
A: You can, but be careful not to make them too salty. If using garlic salt, reduce or eliminate the additional salt in the garlic butter mixture. Garlic powder gives you more control over the salt level.
Q: How do I store leftover breadsticks and how long do they last?
A: Store cooled breadsticks in an airtight container at room temperature for up to 3 days. Reheat them in a 425°F oven for 4-5 minutes to refresh them. You can also freeze baked breadsticks for up to 2 months and reheat them straight from the freezer.