
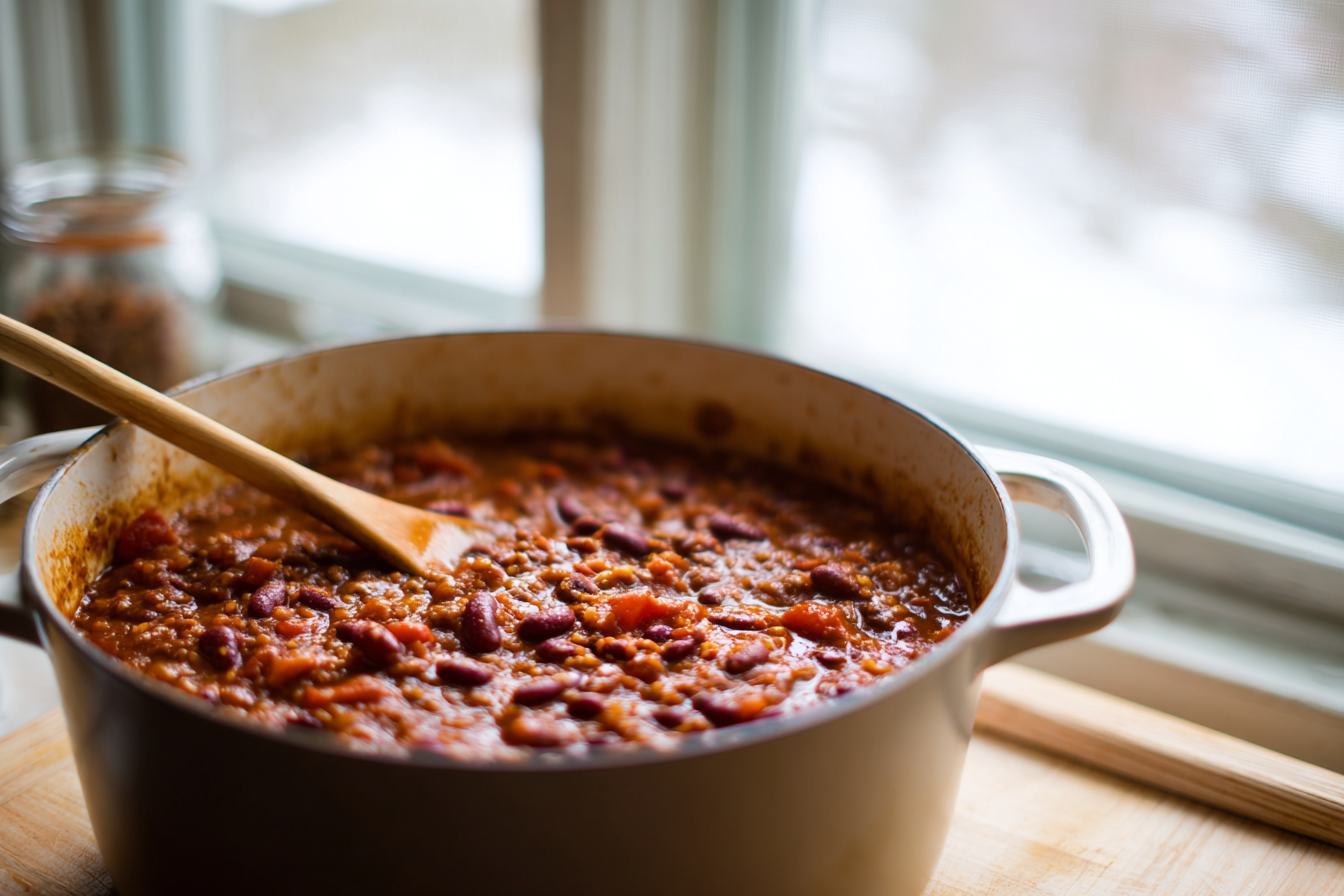
Most weeknights feel like a race against the clock, and the last thing anyone wants is a sink full of dirty pots and pans. That’s exactly why one-pot meals have become such a lifesaver for families everywhere. This beef and bean chili brings together everything needed for a satisfying dinner in a single pot, and the best part is that it’s ready in about 40 minutes from start to finish. No fancy ingredients required, just straightforward items from the pantry and fridge that come together into something everyone will actually eat without complaint.
Why this chili recipe works better than others
Walk into any grocery store and the chili seasoning aisle can feel overwhelming with dozens of options. This recipe simplifies things by using a pre-made chili seasoning packet, which means no guessing about how much cumin or chili powder to add. The combination of ground beef with three different types of beans creates a hearty base that fills people up without breaking the budget. Unlike some recipes that require hours of simmering, this version gets the job done in under an hour, making it perfect for those nights when dinner needs to happen fast but nobody wants to resort to takeout.
The secret to getting great results lies in the layering of ingredients. Starting with browning the beef alongside the onions and peppers builds a solid foundation of taste that carries through the entire pot. The tomato sauce and diced tomatoes add moisture and acidity, while the beans bring texture and substance. What makes this approach better than many other recipes is that everything cooks together just long enough for the tastes to blend, but not so long that the vegetables turn mushy or the beef dries out.
Getting your ingredients ready takes almost no time
Before turning on the stove, having everything prepped and ready makes the actual cooking process much smoother. The ingredient list is straightforward and nothing unusual that requires a trip to a specialty store. Two pounds of lean ground beef forms the protein base, and using 93/7 lean meat means less grease to drain off later. One green bell pepper and one yellow onion need to be diced into bite-sized pieces, which takes maybe five minutes with a sharp knife and cutting board.
The canned goods make up the bulk of this recipe, which is honestly what makes it so convenient. A large 29-ounce can of tomato sauce provides the liquid base, while a 14.5-ounce can of petite diced tomatoes and a 10-ounce can of diced tomatoes with green chilies add chunks and a bit of heat. For the beans, ranch style beans go in with their liquid, but the pinto beans and dark red kidney beans get drained and rinsed first. One packet of McCormick mild chili seasoning and a cup of water round out the ingredient list, making this one of the most straightforward recipes to pull together on a busy evening.
How to cook the beef and vegetables properly
Starting with a large pot or Dutch oven over medium-high heat is important because it gives enough surface area to brown the meat properly. Add the ground beef, diced bell pepper, and diced onion all at once to the pot. Using a wooden spoon or spatula, break up the meat into smaller crumbles as it cooks, stirring occasionally to make sure everything browns evenly. This process takes about 10 minutes, and the meat should lose its pink color while the onions become soft and slightly translucent.
The browning step does more than just cook the meat through. It creates what’s called fond on the bottom of the pot, those little browned bits that add depth to the final dish. If using a fattier ground beef than 93/7, drain off the excess grease before moving to the next step. Otherwise, lean meat doesn’t produce much grease at all. The vegetables should be tender but still have a bit of structure, not completely soft. Once everything is nicely browned, it’s time to add the rest of the ingredients and let the pot work its magic.
Adding everything else and letting it simmer
After the beef and vegetables are properly browned, pour in the tomato sauce first, using a wooden spoon to scrape up any browned bits stuck to the bottom of the pot. Those bits add serious taste to the final dish, so don’t skip this step. Next, add the petite diced tomatoes, the diced tomatoes with green chilies, and all three types of beans. Remember that the ranch style beans go in with their liquid, but the pinto and kidney beans should be drained and rinsed under cold water first to remove excess sodium.
Sprinkle the chili seasoning packet over everything, then add one cup of water to help distribute the spices evenly throughout the pot. Give everything a good stir to combine all the ingredients, making sure the seasoning doesn’t clump together. Bring the mixture to a boil over medium-high heat, which should take just a few minutes. Once it reaches a boil, reduce the heat to medium-low and let it simmer for about 15 minutes, stirring occasionally. This simmering time allows all the tastes to blend together while the vegetables finish cooking through until they’re tender but not mushy.
Toppings that make each bowl better
Plain chili is good, but chili with toppings becomes something special that everyone can customize to their liking. Setting up a toppings bar on the counter turns a regular dinner into something that feels more fun and interactive. Shredded cheddar cheese is probably the most popular choice and melts beautifully over hot chili. A dollop of sour cream adds creaminess and helps cool down any heat from the chilies, while diced red onions bring a sharp crunch that contrasts nicely with the soft beans.
Other topping options include sliced jalapeños for those who like extra heat, fresh cilantro leaves for brightness, and lime wedges to squeeze over the top for acidity. Some people swear by adding a handful of crushed tortilla chips or Fritos right into their bowl for crunch. Frito chili pie is actually a regional favorite in parts of Texas and New Mexico, where corn chips form the base of the bowl with chili piled on top. Green onions, avocado slices, and even a splash of hot sauce are all fair game. The beauty of toppings is that picky eaters can skip what they don’t like while adventurous eaters can pile everything on.
What to serve alongside your chili
Chili is hearty enough to stand alone as a complete meal, but sometimes a side dish makes dinner feel more substantial. Cornbread is the classic pairing, whether it’s made from scratch or from a box mix like Jiffy. The slightly sweet, crumbly texture of cornbread complements the savory, slightly spicy chili perfectly. Some people prefer cornbread muffins because they’re easier to grab and don’t require cutting, making them ideal for kids who want to dip their cornbread right into their bowl.
Saltine crackers are another simple option that requires zero preparation and adds a salty crunch to each spoonful. A simple side salad with iceberg lettuce, tomatoes, and ranch dressing provides something cool and crisp to balance the warm chili. For a heartier accompaniment, tortilla chips work great for scooping, and they’re sturdy enough not to break apart in thick chili. Some families like serving chili over a baked potato or white rice to stretch it even further, which is especially helpful when feeding a crowd or trying to make leftovers go the extra mile.
Making substitutions when ingredients are missing
Running out of a specific ingredient doesn’t mean chili night has to be cancelled. Ground turkey or ground chicken can easily replace the beef if that’s what’s available in the fridge or if someone prefers poultry. The cooking process remains exactly the same, though poultry tends to be a bit leaner so watch for sticking. Different colored bell peppers work just as well as green ones, with red, yellow, or orange peppers adding a slightly sweeter note to the pot.
Bean varieties are completely flexible based on what’s sitting in the pantry. Great northern beans, navy beans, or even black-eyed peas can substitute for any of the three types called for in the recipe. Some people skip beans entirely and add more meat for a Texas-style chili, though that changes the texture significantly. If a chili seasoning packet isn’t available, making a homemade blend with 2 tablespoons chili powder, 1 teaspoon cumin, 1 teaspoon paprika, half a teaspoon each of garlic and onion powder, and a quarter teaspoon cayenne pepper works great. The cup of water can be swapped for beef broth or even beer for added depth, though plain water works perfectly fine.
Storing leftovers and reheating properly
One of the best things about making a big pot of chili is having leftovers for lunch or another dinner during the week. Once the chili has cooled to room temperature, transfer it to airtight containers and store in the refrigerator for up to three or four days. Glass containers with tight-fitting lids work better than plastic because they don’t absorb the red color from the tomatoes. Portion the chili into individual servings before storing makes grabbing lunch for work much easier.
Freezing chili extends its life considerably, lasting up to two or three months in the freezer. Use freezer-safe containers or heavy-duty freezer bags, making sure to squeeze out as much air as possible before sealing to prevent freezer burn. Label each container with the date so nothing gets forgotten in the back of the freezer. When ready to eat, thaw frozen chili in the refrigerator overnight rather than at room temperature. Reheat individual portions in the microwave for a few minutes, stirring halfway through, or warm larger amounts in a pot on the stove over medium heat, stirring occasionally until heated through.
Ways to use leftover chili beyond bowls
Having leftover chili opens up possibilities for completely different meals without any extra cooking required. Chili cheese dogs transform regular hot dogs into something special by spooning warm chili over grilled or boiled hot dogs in buns, then topping with shredded cheese. Baked potatoes become a complete meal when split open and loaded with chili, sour cream, cheese, and green onions. Some people even stuff bell peppers with leftover chili and bake them until the peppers are tender.
Chili mac combines two comfort foods into one by stirring cooked elbow macaroni into the chili and topping with extra cheese. Making a chili omelet for breakfast sounds weird but actually tastes amazing, with eggs wrapped around warm chili and cheese. Nachos loaded with chili make an easy appetizer or game day snack, with tortilla chips arranged on a baking sheet, topped with chili and cheese, then broiled until bubbly. Chili can even be used as a topping for pizza, though that’s definitely an acquired taste. The point is that leftover chili is incredibly versatile and can be transformed into something that feels completely different from the original dinner.
Making a big pot of chili on Sunday means having ready-made dinners and lunches throughout the week with minimal effort. This recipe proves that one-pot meals don’t have to be boring or bland, and that homemade food can be just as convenient as anything from a restaurant. The combination of beef, beans, and tomatoes creates something satisfying that works for picky eaters and adventurous ones alike, and the toppings bar makes everyone feel like they’re getting exactly what they want in their bowl.
One-Pot Beef and Bean Chili
Cuisine: American8
servings15
minutes25
minutes320
kcalThis hearty beef and bean chili comes together in one pot with simple pantry ingredients and cooks in under an hour for an easy weeknight dinner.
Ingredients
2 pounds lean ground beef (93/7)
1 green bell pepper, diced
1 yellow onion, diced
1 (29-ounce) can tomato sauce
1 (14.5-ounce) can petite diced tomatoes
1 (10-ounce) can diced tomatoes with green chilies
1 (15-ounce) can ranch style beans, undrained
1 (15.5-ounce) can pinto beans, drained and rinsed
1 (15.5-ounce) can dark red kidney beans, drained and rinsed
1 packet McCormick mild chili seasoning (or your favorite brand)
1 cup water
Directions
- Place a large pot or Dutch oven over medium-high heat and add the ground beef, diced bell pepper, and diced onion all at once. Use a wooden spoon or sturdy spatula to break up the meat into smaller crumbles as it cooks. Stir occasionally to ensure even browning, cooking for about 10 minutes until the meat has lost all its pink color and the onions have become soft and slightly translucent. If using ground beef with higher fat content than 93/7, drain off any excess grease at this point.
- Pour the tomato sauce into the pot first, using your wooden spoon to scrape up any browned bits stuck to the bottom of the pot, as these add considerable depth to the final dish. Add the petite diced tomatoes, diced tomatoes with green chilies, ranch style beans with their liquid, drained and rinsed pinto beans, and drained and rinsed kidney beans. Stir everything together to distribute the ingredients evenly throughout the pot.
- Sprinkle the chili seasoning packet evenly over the mixture, then add the cup of water to help distribute the spices throughout the pot and prevent clumping. Give everything a thorough stir, making sure the seasoning is well incorporated and not sitting in clumps on top. The mixture should look evenly colored at this point.
- Increase the heat to bring the chili to a rolling boil, which should take just a few minutes. Once it reaches a boil with large bubbles breaking the surface, reduce the heat to medium-low so the chili maintains a gentle simmer. Cover the pot with a lid and let it simmer for 15 minutes, stirring occasionally to prevent anything from sticking to the bottom. The vegetables should be tender but not mushy, and all the ingredients will have melded together.
- After the simmering time is complete, remove the pot from heat and taste the chili, adjusting with additional salt or seasoning if needed. The chili should be thick and hearty at this point, coating the back of a spoon when stirred. If it seems too thick, add a splash more water or beef broth and stir to incorporate.
- Ladle the hot chili into individual bowls for serving. Set out a variety of toppings in small bowls on the table so everyone can customize their bowl to their liking. Popular topping options include shredded cheddar cheese, sour cream, diced red onions, sliced jalapeños, fresh cilantro, lime wedges, crushed tortilla chips, or sliced green onions.
- Store any leftover chili in airtight containers in the refrigerator for up to 4 days. The chili tastes even better the next day after all the spices have had time to meld together overnight. Reheat individual portions in the microwave for 2-3 minutes, stirring halfway through, or warm larger amounts on the stovetop over medium heat.
- For longer storage, freeze the chili in freezer-safe containers or heavy-duty freezer bags for up to 2-3 months. Remove as much air as possible from bags before sealing to prevent freezer burn. Thaw frozen chili in the refrigerator overnight before reheating.
Notes
- If you can’t find ranch style beans, use regular pinto beans and add an extra half teaspoon of chili powder for similar results.
- Ground turkey or ground chicken can be substituted for the beef using the exact same cooking method.
- For a spicier chili, use hot chili seasoning instead of mild, or add diced jalapeños with the bell pepper and onion.
- The cup of water can be replaced with beef broth or even beer for additional depth and richness.
- This recipe doubles easily for feeding a crowd or making extra portions for the freezer.
Frequently asked questions
Q: Can this chili be made in a slow cooker instead?
A: Absolutely. Brown the beef, peppers, and onions in a skillet first, then transfer everything to a slow cooker with the remaining ingredients. Cook on low for 6-8 hours or on high for 3-4 hours. The slow cooker method makes the beef extra tender and allows for even more blending of the spices.
Q: What if the chili turns out too watery?
A: Let it simmer uncovered for an additional 10-15 minutes to allow excess liquid to evaporate and the chili to thicken naturally. The beans will also absorb liquid as the chili sits, so it may thicken on its own after cooling and reheating. Avoid adding flour or cornstarch as they can make the texture gummy.
Q: Can I skip the beans to make Texas-style chili?
A: Yes, just leave out all three types of beans and increase the ground beef to 3 pounds instead of 2. You may want to add an extra can of diced tomatoes to maintain the volume. Texas-style chili focuses on the meat and spices without any beans at all.
Q: How can I make this chili less spicy for kids?
A: Use mild chili seasoning as the recipe calls for, and skip the diced tomatoes with green chilies, replacing them with regular diced tomatoes instead. You can also reduce the chili seasoning packet to three-quarters of the packet if even the mild version seems too spicy. Adults can add hot sauce or jalapeños to their individual bowls.