
Ever found yourself craving chocolate cake at 11 PM with nothing but basic pantry ingredients? That moment when every bakery is closed and you’re not about to bake an entire cake just for a quick sweet fix hits differently. The solution that actually works is sitting right on your counter – your microwave can create a genuinely delicious chocolate cake in under two minutes, and it won’t taste like rubbery disappointment.
Most people use the wrong mug size
The biggest mistake people make is grabbing their favorite coffee mug without thinking about size. A standard 8-ounce coffee mug will overflow every single time, creating a mess in your microwave and leaving you with half a cake. The batter rises significantly during cooking, sometimes doubling in volume. Using a mug that’s too small means watching your cake spill over the sides and onto your microwave turntable.
The perfect mug cake requires a large, wide mug that holds at least 12 ounces. Look for mugs that are broader rather than tall and narrow – this gives the cake room to rise without overflowing. Some people even use oversized soup mugs or wide ceramic bowls to ensure they have enough space. The extra room also helps the cake cook more evenly since the batter can spread out rather than staying thick in the center.
Your microwave wattage changes everything
Most mug cake failures happen because people follow timing instructions without considering their microwave’s power. A 700-watt microwave and a 1200-watt microwave will cook the same batter completely differently. High-powered microwaves can turn your cake into rubber in seconds, while lower-powered ones might leave you with raw batter in the middle. Check the wattage sticker inside your microwave door or in the manual – this number determines your success.
Start with 45 seconds for high-wattage microwaves (1000+ watts) and 90 seconds for lower-powered ones. The cake is done when the center looks just set but still slightly shiny on top. It will continue cooking from residual heat even after you stop the microwave. Many people make the mistake of cooking until the top looks completely dry, which results in an overcooked, tough cake that tastes more like cardboard than chocolate.
The flour to liquid ratio matters more than you think
Too much flour creates a dense, heavy cake that sits like a brick in your stomach. Too little flour and your cake becomes a gooey mess that never properly sets. The perfect chocolate mug cake uses exactly 1/4 cup of all-purpose flour – measure it properly by spooning it into your measuring cup and leveling it off. Don’t just scoop directly from the bag, which packs in way more flour than you need.
The liquid components need to balance perfectly with the flour. This means 3 tablespoons of milk, 2 tablespoons of oil, and 1 tablespoon of water. Some recipes skip the water entirely, but it actually helps create the perfect texture by adding steam during cooking. The extra moisture prevents the cake from becoming dry and crumbly, which is a common problem with microwave baking.
Cocoa powder quality makes or breaks the taste
Not all cocoa powder is created equal, and using the wrong type ruins your cake before you even start. Hot chocolate mix is not cocoa powder – it contains sugar, milk powder, and other additives that will throw off your recipe completely. You need unsweetened cocoa powder, the kind that tastes bitter and intense on its own. Dutch-processed cocoa works beautifully and creates a richer, less acidic chocolate taste.
Two tablespoons of high-quality cocoa powder creates the perfect chocolate intensity without making the cake too bitter. Cheap cocoa powder often tastes chalky and weak, requiring you to add more, which then throws off the dry ingredient balance. Brands like Hershey’s Special Dark or Ghirardelli produce consistent results and actually taste like real chocolate rather than brown-colored flour.
Room temperature ingredients work better than cold ones
Cold milk straight from the refrigerator doesn’t mix well with the other ingredients and can create pockets of unmixed flour in your finished cake. Room temperature milk blends smoothly and helps create an even texture throughout. If you forget to take your milk out ahead of time, microwave it for 10-15 seconds to take the chill off, but don’t make it hot.
The same goes for eggs if your recipe uses them, though this particular chocolate mug cake works perfectly without eggs. Oil should also be at room temperature – cold oil doesn’t distribute evenly and can create greasy spots in your cake. Taking five minutes to let your ingredients come to room temperature makes the difference between a professional-tasting cake and something that tastes homemade in the worst way.
Stirring technique prevents lumpy disasters
Mix all your dry ingredients first – flour, sugar, cocoa powder, baking soda, and salt. Whisk them together thoroughly before adding any wet ingredients. This prevents flour pockets and ensures the leavening agents distribute evenly. Many people dump everything in at once and wonder why their cake has weird lumps and uneven texture.
When you add the wet ingredients, stir just until combined. Overmixing develops the gluten in the flour, making your cake tough and chewy instead of tender. Make sure to scrape the bottom of the mug – flour has a sneaky way of hiding down there and creating a dense layer at the bottom of your finished cake. A few gentle stirs with a fork or small spoon is all you need.
Timing the rest period prevents rubbery texture
The moment your microwave beeps, resist the urge to immediately dig in. The cake is still cooking from residual heat and needs at least 30 seconds to a full minute to set properly. Eating it too soon means getting a mouthful of scalding hot, gooey batter that hasn’t had time to finish cooking through.
This resting time also allows the steam to settle and the texture to firm up to proper cake consistency. If you cut into it immediately, the center might still be too soft and wet. The perfect mug cake should hold together when you scoop it with a spoon but still feel moist and tender. The resting period helps achieve this ideal texture that makes microwave mug cakes actually worth eating.
Add-ins need to be chopped small enough
Chocolate chips are the most popular mug cake add-in, but regular-sized chips can create problems in the short cooking time. Large chips don’t melt completely and can create hard, cold pockets in your finished cake. Mini chocolate chips work much better because they distribute more evenly and melt completely during the brief cooking time.
Other add-ins like nuts, dried fruit, or candy pieces should be chopped into small bits – nothing bigger than a mini chocolate chip. Large pieces can also prevent the cake from cooking evenly since they create thick spots in the batter. About a tablespoon of add-ins is perfect – more than that and you risk affecting the cake’s structure and cooking time.
The cooling process affects the final texture
How you handle your mug cake after cooking determines whether you end up with a tender, moist cake or a dense, heavy one. Don’t flip it out of the mug immediately – eat it right from the mug while it’s still warm. The residual heat from the ceramic helps keep the cake at the perfect temperature and texture.
If you absolutely must wait before eating, cover the mug with a small plate to trap the moisture and prevent the top from drying out. Mug cakes are meant to be eaten fresh and warm – they don’t improve with time like regular cakes do. The texture changes as it cools completely, becoming denser and less appealing than when it first comes out of the microwave.
Getting the perfect chocolate mug cake isn’t about luck – it’s about understanding how microwave baking actually works. The right mug size, proper ingredient ratios, and correct timing turn a simple craving into a genuinely satisfying dessert. Now that late-night chocolate craving doesn’t have to mean settling for whatever random snacks are in your pantry.
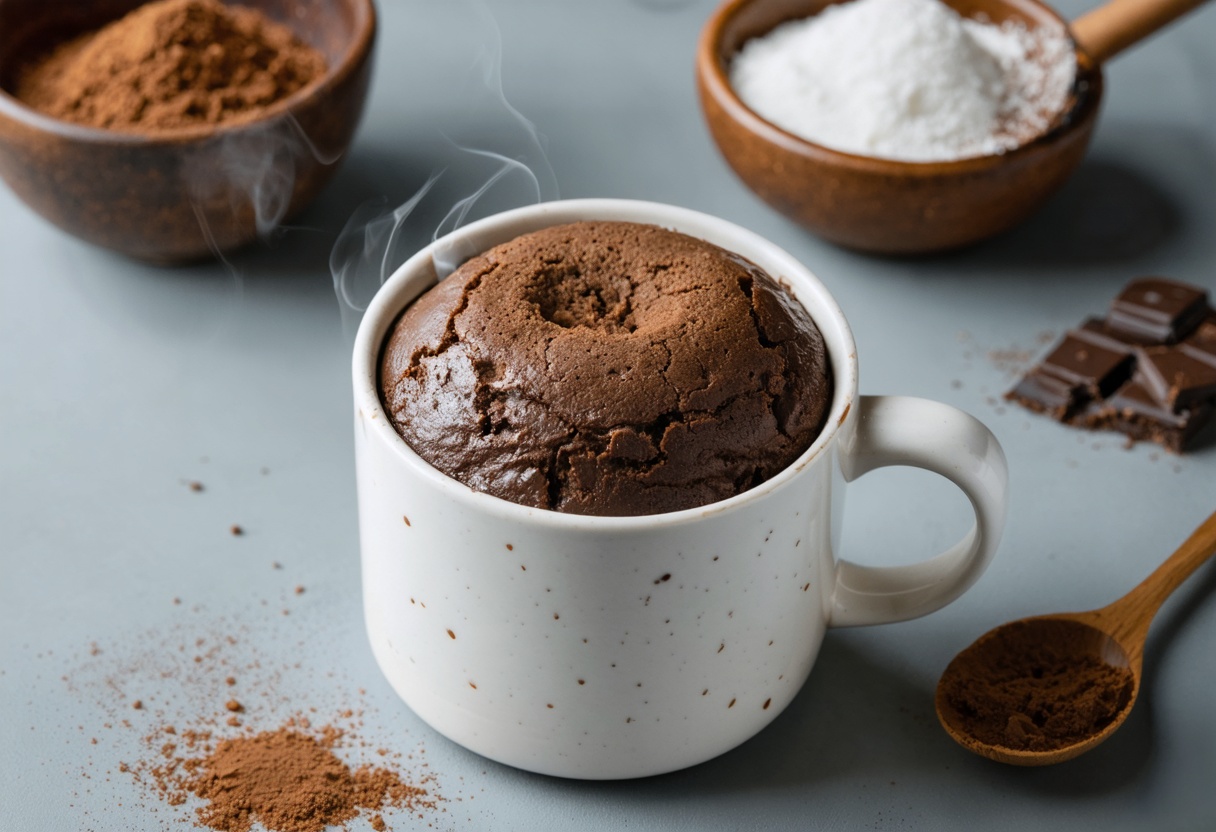
Perfect Chocolate Mug Cake
Cuisine: American1
servings5
minutes2
minutes603
kcalRich, fudgy chocolate cake made in your microwave in under 2 minutes with ingredients you already have.
Ingredients
1/4 cup all-purpose flour
1/4 cup white sugar
2 tablespoons unsweetened cocoa powder
1/8 teaspoon baking soda
1/8 teaspoon salt
3 tablespoons milk
2 tablespoons canola oil
1 tablespoon water
1/4 teaspoon vanilla extract
Directions
- Gather all ingredients and select a large microwave-safe mug that holds at least 12 ounces. Make sure your mug is wider rather than tall to prevent overflow during cooking. Check that all liquid ingredients are at room temperature for best mixing results.
- In your selected mug, whisk together all dry ingredients: flour, sugar, cocoa powder, baking soda, and salt. Mix thoroughly to ensure even distribution and prevent lumps. Make sure the cocoa powder is completely incorporated and no streaks remain.
- Add the milk, canola oil, water, and vanilla extract to the dry ingredients. Stir just until combined, being careful not to overmix. Scrape the bottom of the mug to ensure no flour is hiding underneath and creating dense spots.
- Place the mug in the center of your microwave. Cook for 1 minute and 45 seconds for standard wattage microwaves, or adjust timing based on your microwave’s power. The cake is done when the center looks just set but still slightly shiny on top.
- Allow the cake to rest in the microwave for 30 seconds to 1 minute after cooking. This resting time lets the cake finish cooking from residual heat and prevents a rubbery texture. The cake will continue to set during this period.
- Carefully remove the mug from the microwave using oven mitts, as it will be very hot. Check that the center is set by gently pressing with a spoon. If still too soft, microwave for an additional 15 seconds.
- Serve immediately while warm directly from the mug. Top with ice cream, whipped cream, or additional chocolate chips if desired. The cake is best enjoyed fresh and warm for optimal texture and taste.
Notes
- For high-powered microwaves (1000+ watts), start with 45 seconds and add time as needed to prevent overcooking
- For a healthier version, substitute 1½ tablespoons unsweetened applesauce for the oil and use an extra teaspoon of water
- Add mini chocolate chips or chopped nuts after mixing the batter, using no more than 1 tablespoon to avoid affecting cooking time
Frequently asked questions about chocolate mug cake
Q: Can I make this mug cake without eggs?
A: Yes! This recipe doesn’t use eggs at all, which makes it perfect for people with egg allergies or when you’re out of eggs. The combination of baking soda, oil, and the right liquid ratios creates the perfect texture without needing eggs as a binding agent.
Q: Why does my mug cake come out rubbery?
A: Rubbery texture usually means you’ve overcooked the cake. Microwave times vary significantly based on wattage, so start with less time and add more if needed. The cake should look just set on top but still slightly shiny when done.
Q: Can I double this recipe for a bigger cake?
A: You can double the ingredients, but you’ll need to use a much larger microwave-safe bowl and adjust the cooking time. It’s usually better to make two separate mug cakes since they cook more evenly in individual portions.
Q: What’s the best way to store leftover mug cake?
A: Mug cakes are really meant to be eaten fresh and warm. If you must store it, cover tightly and refrigerate for up to 2 days, but the texture won’t be as good. Reheat for 10-15 seconds in the microwave before eating.