
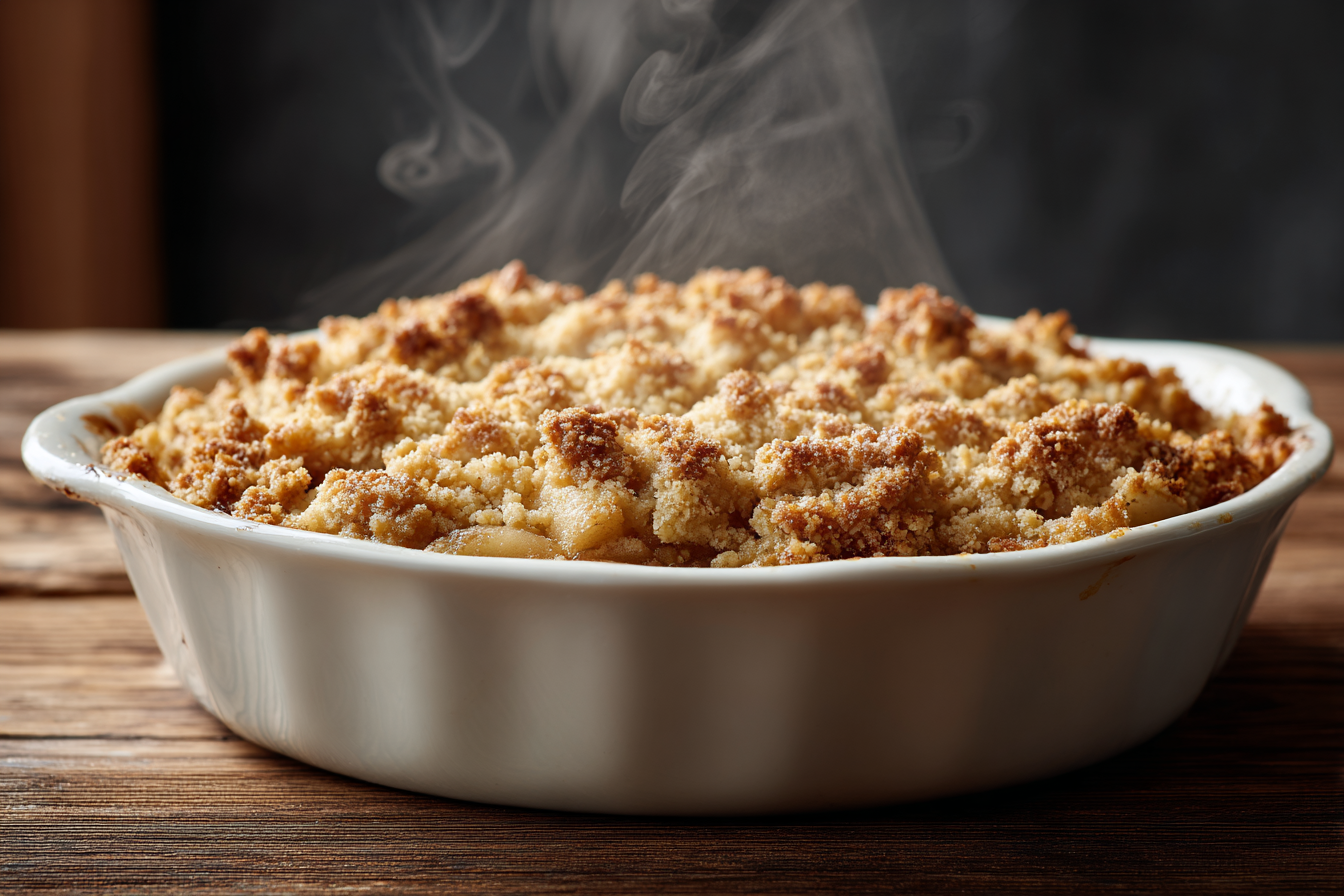
There’s something about opening the oven to find bubbling apple crumble that makes a house feel like home. The sweet smell of cinnamon-spiced apples mixed with buttery, golden topping is enough to make anyone forget about their diet. This dessert is the kind of thing you throw together when friends show up unexpectedly or when you need something comforting on a chilly evening. With just a handful of everyday ingredients and about ten minutes of prep time, you’ll have a warm, satisfying dessert that tastes like you spent hours in the kitchen. Best part? Nobody needs to know how easy it actually was to make.
Why this beats making apple pie every time
Making apple pie seems like a good idea until you remember the whole rolling-out-dough situation. Between getting the crust just right and worrying about soggy bottoms, pie can feel like more work than it’s worth on a weeknight. Apple crumble skips all that hassle entirely. There’s no dough to chill, no lattice work to perfect, and no stress about whether your crust will hold together when you slice it. Just toss your apples with some spices, sprinkle on a simple topping, and let the oven do its thing.
The crumble topping comes together in one bowl with melted butter stirred into flour, brown sugar, and cinnamon. That’s it. No food processor needed, no fancy technique required. According to The Kitchn, you can even make the topping ahead and freeze it for up to three months. When you’re ready to bake, just break it into chunks straight from the freezer and scatter it over your apple filling. The whole thing bakes up into a crispy, buttery layer that’s way more interesting than plain pie crust anyway.
Picking the right apples makes all the difference
Not all apples are created equal when it comes to baking. Those soft, mealy ones sitting in your fruit bowl probably won’t cut it. For crumble, you want apples that hold their shape and have a good balance of sweet and tart. Granny Smith apples are the classic choice because they’re reliably tart and won’t turn to mush in the oven. Honeycrisp and Pink Lady apples also work beautifully, bringing a little more sweetness while still maintaining structure.
Some people like mixing apple varieties to get more complex taste, which is a smart move if you have different kinds lying around. The recipe from Mom On Timeout uses about two and a half pounds of apples, which equals roughly six to seven cups once they’re peeled and chopped. If you’re dreading all that peeling, consider grabbing an apple peeler corer slicer gadget. They’re ridiculously satisfying to use and turn a tedious job into something that takes just minutes. Or honestly, leave the peels on if you don’t mind a little extra texture in your filling.
Getting that perfectly crumbly topping texture
The topping is where crumble really shines. It should be crispy on top, with a mix of small and larger chunks that create interesting texture in every bite. The secret is in how you mix it. After whisking together your dry ingredients, pour in melted butter and stir with a fork until you get a mixture that looks thick and slightly pasty. Don’t worry if it seems wrong at this point because it’ll firm up in the fridge while you prep your apples.
Brown sugar is key here because it adds those caramel notes that make crumble taste so rich and comforting. Light or dark brown sugar both work fine, though dark will give you a deeper molasses taste. The mixture should form various sizes of crumbs when you break it apart before baking. According to Erin O’Brien, adding baking powder to the topping gives it a little extra lift and crunch. Some recipes include oats, but true crumble keeps it simple with just flour, sugar, butter, and spices. The result bakes up golden brown and crispy, creating the perfect contrast to the soft, sweet apples underneath.
The spices that make it smell amazing
Cinnamon is the obvious choice for apple crumble, but don’t stop there. A pinch of freshly grated nutmeg adds warmth and depth that makes the whole dessert more interesting. Vanilla bean paste or vanilla extract in the filling brings everything together with its sweet, aromatic quality. The beauty of this dessert is how the spices bloom in the oven, filling your kitchen with smells that make everyone ask what you’re baking.
If you want to experiment, apple pie spice is an easy swap that includes cinnamon, nutmeg, allspice, and sometimes ginger or cardamom. It gives you more complexity without having to measure multiple spices. Just remember that a little goes a long way with warm spices. Too much nutmeg can make things taste medicinal, and too much cinnamon can be overpowering. Start with the amounts in the recipe and adjust next time if you want more punch. The lemon juice might seem like an odd addition, but it brightens the whole filling and keeps the apples from turning brown while you work.
How to avoid a watery filling situation
Nobody wants to cut into their crumble only to find a pool of liquid at the bottom. Apples release a lot of juice as they bake, which is why you need something to thicken all that moisture. Cornstarch is the usual choice because it creates a glossy, thick filling that holds together nicely. All-purpose flour works too, though it gives you a slightly cloudier result. Either way, use about two tablespoons mixed right in with your apples before baking.
The other trick is letting your crumble cool for at least fifteen minutes after it comes out of the oven. This gives the filling time to set up and thicken properly. Cutting into it too soon means all that liquid won’t have solidified yet. The recipe instructions from The Kitchn suggest baking until you see juices bubbling around the edges and the topping is golden brown. That bubbling is your signal that everything’s cooking properly and the filling is thickening up. If your topping starts getting too dark before the filling is done, tent some aluminum foil over the top for the rest of baking time.
Serving suggestions that make it even better
Warm apple crumble with vanilla ice cream is pretty much unbeatable. The cold, creamy ice cream melting into the hot, spiced apples creates this perfect temperature contrast that makes every bite interesting. If you’re feeling fancy, drizzle some caramel sauce over the whole thing. The sweet, buttery caramel takes an already great dessert and makes it restaurant-quality. Whipped cream works too, especially if you dust a little cinnamon or apple pie spice on top.
Leftovers keep in the fridge for up to three days, and they’re surprisingly good cold the next morning. Some people eat leftover crumble over yogurt or oatmeal for breakfast, which sounds weird until you try it. If you want to reheat it, pop it in a 300-degree oven for about twenty minutes until it’s warmed through. The microwave works in a pinch, but the topping won’t be as crispy. For individual servings, you can bake the crumble in ramekins instead of one big dish. Just divide everything evenly and check them a bit earlier since smaller portions cook faster.
Making it work for a crowd
Apple crumble scales up really easily when you need to feed more people. Double the recipe and use a nine-by-thirteen-inch baking dish instead of the smaller eight or nine-inch pan. Everything else stays the same, though you might need a few extra minutes of baking time. This makes it perfect for holiday gatherings when you need dessert for a dozen people but don’t want to spend all day in the kitchen.
The make-ahead factor is huge too. You can prep the topping days in advance and keep it in the fridge, or freeze it like mentioned earlier. The apple filling comes together quickly enough that you can do it right before baking, but if you’re really crunched for time, toss the apples with all their ingredients and keep them in the fridge for a few hours. Just know they might release some liquid sitting there, so drain off any excess before adding them to your baking dish. This dessert is forgiving enough that even if things aren’t perfect, it’ll still turn out delicious.
Why butter temperature actually matters
The recipe calls for melted butter, which might seem random, but it makes mixing the topping incredibly easy. Cold butter would require cutting it into the flour with a pastry cutter or your fingers, which is messier and takes longer. Melted butter stirs right in with a fork, creating those perfect crumbles in seconds. Just let it cool for five minutes after melting so it doesn’t cook the other ingredients when you mix everything together.
Using unsalted butter gives you better control over the salt level in your recipe. There’s already salt added to both the topping and filling, so salted butter might make everything taste too salty. If you only have salted butter on hand, just cut back on the added salt by about half. The butter is what makes the topping rich and crispy, so don’t try to substitute with oil or anything else. It won’t work the same way. One stick of butter is exactly eight tablespoons, which is convenient since that’s what most recipes call for. No math required, just unwrap and melt.
Common mistakes that are easy to avoid
Cutting your apple pieces too thin is a common problem that leads to mushy filling. Aim for quarter-inch slices or chunks so they soften without turning to applesauce. On the flip side, pieces that are too thick won’t cook through in the baking time. Another mistake is not greasing your baking dish, which makes serving way harder than it needs to be. A quick spray of cooking oil or smear of butter on the bottom and sides prevents sticking.
Skipping the lemon juice might not seem like a big deal, but it really does help balance all the sweetness and keeps your apples from oxidizing and turning brown. If you don’t have fresh lemon, bottled lemon juice works fine here. Not letting the crumble cool enough before serving is probably the most common mistake. Everyone wants to eat it right away, but that cooling time is when the filling thickens up properly. Patience pays off with a dessert that holds together nicely instead of being soupy. Also, make sure your oven is actually preheated to 375 degrees before the dish goes in, otherwise your timing will be off.
Apple crumble proves that the best desserts don’t have to be complicated. With simple ingredients and minimal fuss, you get something warm and comforting that feels special without requiring pastry skills or fancy equipment. Whether you’re making it for a holiday dinner or just because it’s Tuesday and you want something sweet, this recipe delivers every single time. The combination of tender, spiced apples under that crispy, buttery topping is hard to beat, especially when there’s ice cream involved.
Sweet Apple Crumble with Warm Spices
Cuisine: American6
servings15
minutes45
minutes367
kcalThis warm, comforting apple crumble features tender cinnamon-spiced apples beneath a buttery, golden crumble topping that’s impossibly easy to make.
Ingredients
6 to 8 apples (about 2 1/2 pounds), peeled, cored, and sliced into 1/4-inch pieces
1/4 cup granulated sugar
1/4 cup brown sugar
1 1/2 tablespoons all-purpose flour
1 tablespoon fresh lemon juice
2 teaspoons ground cinnamon
Pinch of freshly grated nutmeg
1/2 teaspoon vanilla bean paste or vanilla extract
1 cup all-purpose flour
3/4 cup rolled oats
1 cup brown sugar
8 tablespoons unsalted butter (1 stick), melted
1/2 teaspoon ground cinnamon
1/2 teaspoon kosher salt
Directions
- Preheat your oven to 375 degrees Fahrenheit. Take a 9×12-inch baking dish and grease it well with butter or cooking spray to prevent sticking. Set the prepared dish aside while you work on the filling and topping.
- Peel all the apples using a vegetable peeler or paring knife, then core them and slice into 1/4-inch thick pieces. Place all the apple slices into a large mixing bowl. Add the granulated sugar, brown sugar, flour, cinnamon, nutmeg, vanilla bean paste, and lemon juice to the bowl with the apples.
- Toss the apples with all the ingredients until every piece is thoroughly coated with the sugar and spice mixture. Transfer the coated apples to your prepared baking dish and spread them out into an even layer. Make sure the apples are distributed evenly so they cook uniformly.
- In a separate medium mixing bowl, combine the flour, rolled oats, brown sugar, cinnamon, and salt for the crumble topping. Whisk these dry ingredients together until well mixed. Pour the melted butter over the dry ingredients and stir with a fork until the mixture comes together and forms crumbles of various sizes.
- The topping mixture will look thick and slightly pasty at this point, which is completely normal. Place the bowl in the refrigerator for about 10 minutes to let it firm up while the apples wait. This chilling step helps create better texture in the finished topping.
- Remove the crumble topping from the refrigerator and break it apart with your hands into large clumps. Scatter these clumps evenly over the top of the apple filling in the baking dish. Don’t worry about making it perfect; the rustic look is part of the charm.
- Place the baking dish in your preheated oven and bake for approximately 50 minutes. You’ll know it’s done when the topping is golden brown and the apple filling is tender and bubbling around the edges. If the topping starts getting too dark before the filling is done, loosely tent aluminum foil over the top for the remaining baking time.
- Remove the crumble from the oven and let it cool for at least 15 minutes before serving. This cooling time allows the filling to thicken properly so it’s not too runny when you scoop it out. Serve warm with a generous scoop of vanilla ice cream on top for the ultimate treat.
Notes
- Granny Smith, Honeycrisp, or Pink Lady apples work best for this recipe as they hold their shape during baking.
- The crumble topping can be made ahead and frozen for up to 3 months; no need to thaw before using.
- Leftovers can be covered and refrigerated for up to 3 days. Reheat in a 300°F oven for 20 minutes.
- For individual servings, divide the filling and topping among ramekins and check for doneness a few minutes earlier.
- If doubling the recipe, use a 9×13-inch baking dish and add a few extra minutes to the baking time.
Frequently asked questions
Q: Can I use other fruits instead of apples?
A: Absolutely! Pears work beautifully in this recipe, as do berries like blueberries or blackberries. Peaches are fantastic in summer. Just keep the amount of fruit the same and adjust sugar slightly based on how sweet your fruit is. Stone fruits might release more liquid, so consider adding an extra tablespoon of cornstarch to the filling.
Q: Do I really need to peel the apples?
A: Not necessarily. Leaving the peels on adds fiber and texture, plus it saves time. Just wash the apples thoroughly first. The peels will soften during baking and most people won’t even notice them. If you’re using red apples, the peels can add nice color to the filling too.
Q: Why is my crumble topping not getting crispy?
A: This usually happens if there’s too much moisture. Make sure your butter isn’t too hot when you mix the topping, and don’t skip the refrigeration step. Also, be sure your oven is fully preheated before baking. If the topping seems soggy after baking, you can run it under the broiler for a minute or two to crisp it up, watching carefully so it doesn’t burn.
Q: Can I make this ahead of time?
A: You can assemble the whole thing up to a day in advance and keep it covered in the refrigerator before baking. The apples might release some liquid sitting there, so drain any excess before baking. Alternatively, bake it completely, then reheat before serving. The topping won’t be quite as crispy reheated, but it’ll still taste great.