
When you want to wow people at dinner parties or special occasions, chocolate mousse cake delivers every single time. It looks fancy enough to come from a bakery, but the secret is that it’s surprisingly doable at home. Three distinct layers of chocolate come together in one stunning dessert that gets rave reviews. The best part? You can prep components ahead of time so you’re not stressed when guests arrive, and the whole thing chills in the fridge while you relax.
Why springform pans make everything easier
Using a springform pan changes the game when making layered desserts. The removable sides mean you can pop off the collar and reveal perfectly smooth edges without any flipping or transferring. For chocolate mousse cake, this matters even more because the mousse layer is delicate and needs that support while it sets. You bake the cake layer right in the pan, let it cool completely, then build everything else on top. When it’s time to serve, simply unlatch the collar and slide it off.
The eight or nine inch size works perfectly for this dessert because it gives you generous height for the mousse layer. Make sure your pan is at least two inches deep so everything fits comfortably. Some people worry about leaks during baking, but wrapping the outside in aluminum foil solves that problem instantly. You end up with clean sides that show off those gorgeous chocolate layers, and guests always ask how you managed to make something so professional-looking.
Building the perfect cake base
The bottom layer needs to be sturdy enough to hold mousse but moist enough to be delicious. A simple one-bowl chocolate cake works beautifully because it comes together in minutes with ingredients you probably have around. Oil-based cakes stay moister than butter cakes, which matters when the dessert sits in the fridge overnight. Adding hot coffee to the batter might sound weird, but it makes the chocolate taste deeper and richer without adding any coffee taste.
Once the cake bakes and cools completely, leveling the top makes a huge difference. Slicing off that domed top creates a flat surface for the mousse and makes the cake more porous so it can soak up moisture. Some recipes call for brushing the cake with a mixture of cocoa powder and hot coffee, which sounds extra but actually transforms the texture into something incredibly tender. The cake becomes stick-to-your-fork moist and provides the perfect foundation for the lighter mousse layer.
Making mousse that actually sets up
Real chocolate mousse traditionally uses raw eggs, which makes some people nervous. The easier version starts with melted chocolate mixed with sweetened condensed milk or a chocolate ganache base. Adding gelatin helps everything firm up properly in the fridge, but you need to bloom it first by sprinkling the powder over water and letting it absorb. Then you heat some cream until it steams, whisk in the bloomed gelatin, and mix everything into your chocolate base.
The magic happens when you fold in whipped cream. Beating heavy cream until stiff peaks form creates that light, airy texture that makes mousse special. Folding means gently mixing with a rubber spatula in a circular motion instead of stirring aggressively. This keeps all those air bubbles intact so your mousse stays fluffy instead of deflating into dense chocolate pudding. Take your time with this step because rushing ruins the texture you worked so hard to create.
What acetate collars do for presentation
These clear plastic sheets wrap around the inside of your springform pan and extend above the rim by an inch or two. They hold the mousse in place while it sets and create those perfectly smooth sides when you peel them away. You can find acetate sheets at craft stores or online, and they’re reusable so one pack lasts forever. Cut a piece slightly longer than your pan’s circumference so the ends overlap, then secure with tape.
Sliding the acetate between the cake and the pan takes a bit of patience, but it slides right in once you get it started. The mousse fills all the way to the top of the collar, which seems scary until you remember that’s exactly what holds everything together. After the cake chills overnight, removing the springform collar and then slowly peeling back the acetate reveals those stunning layers. It’s honestly one of the most satisfying moments in baking, and guests never believe you made it yourself.
Getting the timing right for each component
This dessert involves waiting at several points, so planning ahead prevents last-minute panic. The cake needs to cool completely to room temperature before you add mousse on top, which takes about an hour. The ganache base for the mousse also needs to cool to room temperature, adding another twenty to thirty minutes. Then the assembled cake chills for at least six hours but preferably overnight to make sure the mousse sets all the way through.
Many people split the work over two days, which makes everything less stressful. Bake the cake one evening and let it cool overnight, then make the mousse the next day. The mousse itself keeps for several days in the fridge, so you could even make it first and have it waiting. The ganache topping comes last and only needs twenty minutes to cool before pouring, which you do right before serving. Breaking up the steps this way means you’re never rushed and can actually enjoy the process.
Choosing chocolate that makes a difference
Quality matters more with mousse than almost any other dessert because chocolate is the star ingredient. Using a mix of dark and milk chocolate creates better balance than using just one kind. Dark chocolate with seventy percent cocoa gives rich depth without bitterness, while milk chocolate adds sweetness and creaminess. Avoid chocolate chips for the mousse if possible because they contain stabilizers that affect the texture, though they work fine for the ganache topping.
Brands like Ghirardelli, Guittard, or Valrhona produce consistent results and are worth the extra couple dollars. The chocolate needs to melt smoothly and combine easily with cream, which cheap chocolate sometimes doesn’t do well. Chopping bar chocolate into small, even pieces helps it melt uniformly when you pour hot cream over it. Semi-sweet chocolate chips work in a pinch for simpler versions, but upgrading to quality bar chocolate makes the mousse taste noticeably better and more sophisticated.
Pouring ganache for that bakery look
The final chocolate layer brings everything together visually. Ganache is just chocolate and cream heated together until smooth, and the ratio determines how thick it gets. For a pourable topping that creates drips down the sides, use equal parts chocolate and cream by weight. Let the ganache cool to room temperature so it thickens slightly but still flows easily. If you pour it while too hot, it runs everywhere and looks messy.
Pour the ganache in the center of your chilled mousse cake and use an offset spatula to gently push it toward the edges. Let it naturally drip over the sides instead of forcing it, which creates those gorgeous cascading drips that look so professional. If the ganache gets too thick while you’re working, warm it briefly in the microwave for ten seconds. The cake needs another thirty minutes in the fridge after adding ganache so everything sets properly before slicing.
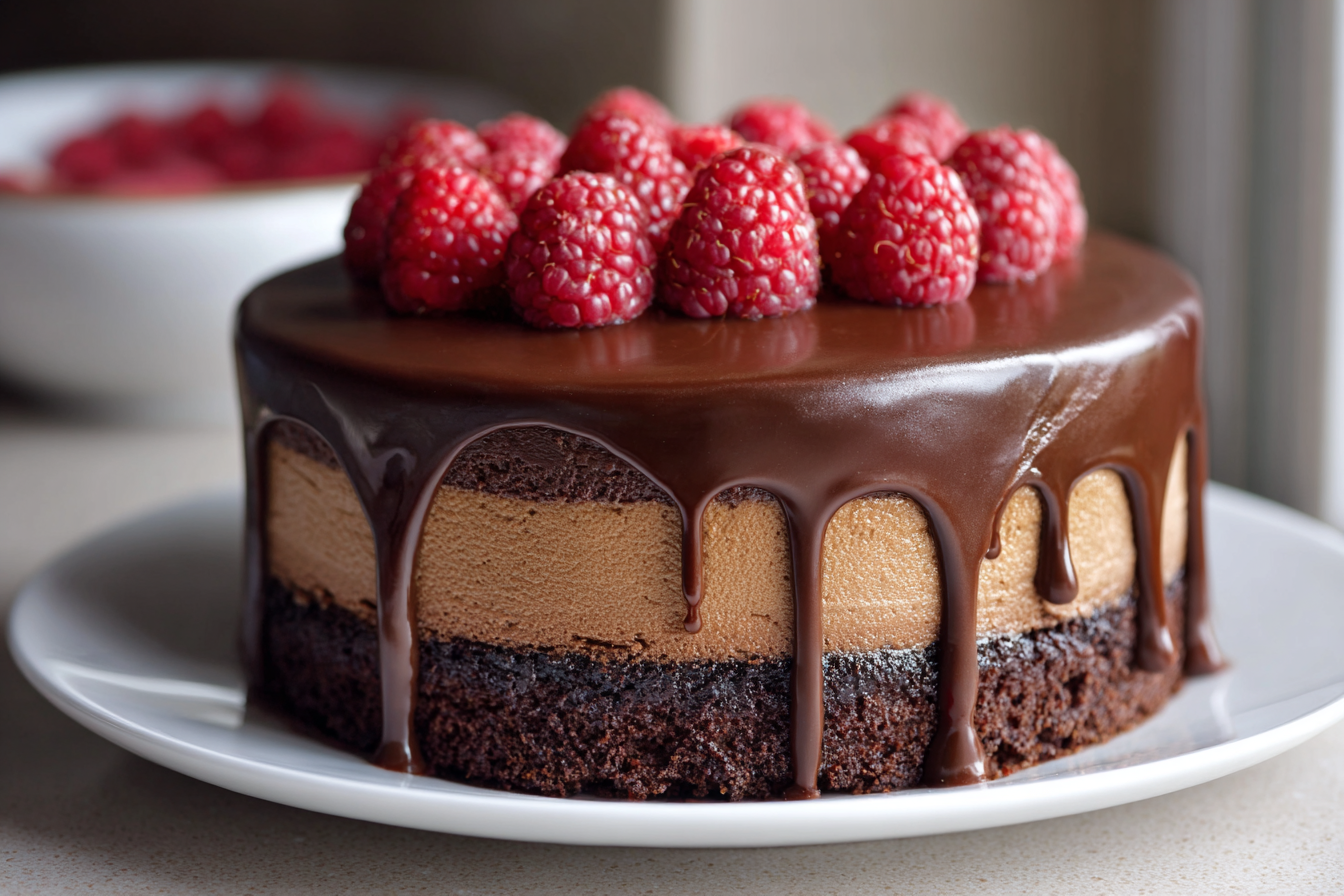
Simple garnishes that add wow factor
Fresh raspberries arranged in a crescent shape on top add color and cut through the richness of all that chocolate. Chocolate-covered espresso beans give a sophisticated touch and hint at the coffee notes in the cake. You can also use chocolate curls, which you can make yourself with a vegetable peeler and a chocolate bar, or buy pre-made ones in the baking aisle. Even just a dusting of cocoa powder through a fine mesh strainer looks elegant.
Keep garnishes simple rather than going overboard with decorations. The beauty of this cake is in those clean layers, so you don’t want to hide them under too much stuff. A few strategically placed berries or a small pile of chocolate shavings in the center works perfectly. Some people add a dollop of whipped cream when serving individual slices, which is nice but completely optional. The cake is rich enough that a little goes a long way, and most people are happy with a modest slice.
Storing and serving at the right temperature
This dessert keeps beautifully in the fridge for up to a week in an airtight container. The mousse layer stays stable thanks to the gelatin, and the cake remains moist from all that chocolate. If you’re serving it straight from the fridge, the mousse will be quite firm and the ganache will have a nice snap to it. Some people prefer letting it sit at room temperature for twenty to thirty minutes before serving so the mousse softens slightly and becomes even more creamy.
Use a sharp knife dipped in hot water and wiped clean between each cut to get perfect slices. The hot knife glides through the layers without dragging mousse everywhere or cracking the ganache. Wipe the knife after every single cut, not just every few cuts, which seems fussy but makes a massive difference in how clean your slices look. Serve on chilled plates if you want to keep everything firm, or room temperature plates if you’re letting the cake warm up a bit first.
Making chocolate mousse cake turns you into the person who brings the dessert everyone remembers. The combination of textures from the tender cake, airy mousse, and smooth ganache creates something truly special that you can’t get from a regular frosted cake. Yes, it takes some planning and patience, but none of the individual steps are particularly difficult. The result is a dessert that looks and tastes like it came from an expensive bakery but costs a fraction of the price and lets you customize everything exactly how you want it.
Chocolate Mousse Cake
Cuisine: American10
servings30
minutes30
minutes385
kcal1
hoursThree spectacular layers of chocolate come together in this show-stopping dessert that looks bakery-perfect but is surprisingly simple to make at home.
Ingredients
1 1/2 cups all-purpose flour
1 cup granulated sugar
1/4 cup unsweetened cocoa powder
1 teaspoon baking soda
1/2 teaspoon salt
1 teaspoon vanilla extract
1 tablespoon white vinegar
1/3 cup vegetable oil
1 cup cold water
- For the Chocolate Mousse:
14 ounces sweetened condensed milk
4 ounces unsweetened baking chocolate, broken into pieces
2 teaspoons vanilla extract
2 cups cold heavy whipping cream
- For the Ganache:
6 ounces dark chocolate, chopped
3/4 cup heavy cream
Fresh raspberries and chocolate-covered espresso beans for garnish (optional)
Directions
- Preheat your oven to 350°F and lightly grease an 8-inch springform pan that’s at least 2 inches deep. For extra insurance against leaks, wrap the outside of the pan with aluminum foil. This creates a barrier in case any batter tries to escape during baking.
- In a medium bowl, whisk together the flour, sugar, cocoa powder, salt, and baking soda until everything is evenly distributed. In a separate bowl, combine the vanilla extract, white vinegar, vegetable oil, and cold water, whisking until mixed. Pour the wet ingredients into the dry ingredients and stir just until the batter is smooth and no flour streaks remain.
- Pour the thin batter into your prepared springform pan and bake for 30 to 35 minutes, until a toothpick inserted in the center comes out clean. Let the cake cool in the pan for 10 minutes, then release the springform collar but leave it in place around the cake. Once the cake reaches room temperature completely, reattach the collar snugly around it.
- Use a serrated knife or cake leveler to slice off the domed top of the cake, creating a flat, level surface. This exposes the porous crumb which will soak up moisture beautifully. Set aside while you make the mousse.
- For the chocolate mousse, melt the unsweetened baking chocolate with the sweetened condensed milk in a heavy saucepan over medium-low heat, stirring frequently so nothing scorches. Once completely melted and smooth, remove from heat and stir in the vanilla extract. Transfer the mixture to a large bowl and let it cool to room temperature, about 90 minutes.
- In a large mixing bowl or stand mixer, beat the cold heavy whipping cream on high speed until stiff peaks form, about 4 minutes. The cream should hold its shape firmly when you lift the beaters. Gently fold the whipped cream into the cooled chocolate mixture using a rubber spatula, being careful not to deflate all those air bubbles you just created.
- Slide an acetate collar between the cake and the inside wall of the springform pan, making sure it extends about an inch above the rim. Pour the chocolate mousse over the leveled cake layer and smooth the top with an offset spatula. Cover the pan loosely with plastic wrap and refrigerate for at least 6 hours, but preferably overnight.
- When ready to serve, make the ganache by heating the heavy cream in a small saucepan until it just begins to steam. Pour the hot cream over the chopped dark chocolate in a bowl and let it sit for 3 minutes without stirring. Then whisk until completely smooth and glossy. Let the ganache cool to room temperature, about 20 minutes.
- Release and remove the springform collar from the chilled mousse cake, then carefully peel away the acetate to reveal those gorgeous layers. Pour the cooled ganache in the center of the cake and use an offset spatula to gently push it to the edges, letting it drip naturally down the sides. Garnish with fresh raspberries and chocolate-covered espresso beans if desired, then refrigerate for 30 minutes to set the ganache before slicing.
Notes
- For best results, allow the cake to cool completely before adding the mousse layer. Any residual warmth will cause the mousse to melt and not set properly.
- The chocolate mousse can be made up to 3 days in advance and stored in the refrigerator until you’re ready to assemble the cake.
- If you don’t have an acetate collar, you can use a strip of parchment paper, though acetate gives cleaner results.
- To get perfect slices, dip your knife in hot water and wipe it clean between each cut.
- Store leftover cake in an airtight container in the refrigerator for up to one week. Let it sit at room temperature for 20-30 minutes before serving for the best texture.
Frequently asked questions
Q: Can I make this cake without a springform pan?
A: Unfortunately, a springform pan is really necessary for this recipe because you need the removable sides to release the delicate mousse layer without damaging it. Regular cake pans won’t work because you can’t unmold the mousse cleanly. An 8 or 9-inch springform pan that’s at least 2 inches deep is essential.
Q: Does the coffee taste come through in the finished cake?
A: Not at all. The coffee just enhances and deepens the chocolate taste without adding any actual coffee notes. If you’re sensitive to caffeine or really dislike coffee, you can substitute hot water instead, though the chocolate won’t taste quite as rich.
Q: How far in advance can I make this cake?
A: You can make the cake layer one day, add the mousse the next day, and keep the assembled mousse cake in the fridge for up to 3 days before adding the ganache topping. The ganache should be added on the day you’re serving for the best appearance, though the whole finished cake keeps well for up to a week refrigerated.
Q: What can I substitute for sweetened condensed milk in the mousse?
A: Sweetened condensed milk is pretty essential to this particular recipe because it provides both sweetness and structure. If you can’t use it, you’d be better off trying a different chocolate mousse recipe that uses egg yolks and gelatin instead, as those work with different techniques entirely.