
Sunday mornings used to be chaos in my kitchen until I discovered this game-changing egg casserole recipe. While most people stress about cooking breakfast for a crowd, this simple dish lets you prep everything the night before and wake up to the smell of perfectly golden eggs baking in the oven. The secret isn’t just in the timing – it’s in the unexpected ingredients that make this casserole incredibly fluffy and rich without any complicated techniques.
Using regular milk instead of the sour cream combination
Most people automatically reach for regular milk when making egg casseroles, but this creates dense, flat results that disappoint everyone at the breakfast table. The magic happens when you combine both sour cream and milk in equal parts – this creates an incredibly fluffy texture that’s almost impossible to achieve with milk alone. The sour cream adds tanginess that cuts through the richness while creating air pockets that make each bite light and satisfying.
The perfect ratio uses one cup of sour cream to one cup of milk for 18 eggs, creating a base that’s creamy without being heavy. This combination works because the acid in sour cream reacts with the eggs during baking, creating a tender texture that regular milk simply can’t match. Many home cooks skip this step thinking it’s unnecessary, but the difference is dramatic – you’ll never go back to plain milk after trying this method.
Forgetting the dried mustard powder makes everything bland
Dried mustard powder sounds like a weird addition to eggs, but leaving it out creates a casserole that tastes flat and one-dimensional. This isn’t about making the eggs taste like mustard – it’s about adding depth that makes people wonder what makes your casserole so much better than everyone else’s. Just half a teaspoon transforms the entire dish by enhancing the natural egg taste without overpowering it.
The mustard powder works similarly to how salt enhances other ingredients – it brings out the richness in both the eggs and cheese while adding a subtle complexity that keeps people coming back for seconds. You can find dried mustard in the spice aisle of any grocery store, and one small container will last through dozens of casseroles. This simple addition separates homemade casseroles from the boring ones that taste like cafeteria food.
Skipping the overnight refrigeration ruins the texture
Rushing to bake the casserole immediately after mixing seems logical, but this creates a dish that’s uneven and doesn’t hold together properly when cut. The overnight refrigeration allows the eggs to fully absorb the liquids and seasonings, creating a cohesive mixture that bakes uniformly. This resting period also lets the cheese distribute evenly throughout the dish instead of creating clumps or pockets.
The science behind this waiting period involves the proteins in the eggs binding with the dairy ingredients, creating a structure that holds together beautifully when baked. When you skip this step, the casserole often turns out watery or separates during cooking, leaving you with a disappointing breakfast that looks nothing like the perfect golden squares you were expecting. Planning ahead isn’t just convenient – it’s essential for the best results.
Using the wrong pan size creates cooking disasters
A 9×13 inch baking dish isn’t just a suggestion – it’s crucial for getting the right thickness and cooking time for this recipe. Using a smaller pan creates a casserole that’s too thick and won’t cook evenly, leaving you with raw centers and overcooked edges. A larger pan makes the mixture too thin, resulting in a tough, rubbery texture that’s nothing like the fluffy perfection you’re aiming for.
The depth of the mixture in a 9×13 pan allows for even heat distribution and the perfect cooking time of 30-40 minutes at 350 degrees. Glass dishes work slightly better than metal because they heat more evenly, but either will work as long as you stick to the correct size. Many people try to double the recipe in a larger pan, but this changes the cooking dynamics completely and usually results in an undercooked mess.
Adding cold ingredients straight from the fridge
Mixing ice-cold eggs and dairy creates a mixture that doesn’t blend properly and can result in uneven cooking. While you don’t need room temperature ingredients like some baking recipes require, taking the eggs and dairy out of the fridge 20-30 minutes before mixing makes a noticeable difference. Cold ingredients don’t incorporate as smoothly, leading to streaks and pockets of unmixed dairy in the finished dish.
The slightly warmer ingredients blend more easily and create a smoother base that bakes more evenly. This is especially important when using a blender to mix everything together – cold ingredients can create lumps that don’t break down properly. If you forget to take them out early, you can quickly warm the dairy in the microwave for 20-30 seconds, but don’t overheat it or you’ll start cooking the eggs prematurely.
Choosing the wrong cheese ruins the whole dish
Pre-shredded cheese might seem convenient, but it’s coated with anti-caking agents that prevent it from melting smoothly into the eggs. This creates a grainy texture and pockets of cheese that don’t distribute evenly throughout the casserole. Freshly shredded cheese melts beautifully and incorporates seamlessly, creating the creamy consistency that makes this dish so appealing.
Sharp cheddar works best because it has enough character to stand up to the eggs without being overwhelming, but you can experiment with combinations like cheddar and monterey jack for extra creaminess. The two cups of cheese might seem like a lot, but it distributes throughout the entire pan and creates just the right amount of cheesy goodness in each bite. Avoid strong cheeses like blue cheese or aged parmesan, which can overpower the delicate egg base.
Not buttering the pan properly causes sticking nightmares
Cooking spray seems like it should work for this recipe, but egg casseroles need real butter to prevent sticking and add richness to the bottom layer. The two tablespoons of melted butter should coat every corner and side of the pan, creating a barrier that ensures easy removal and adds a subtle buttery crust to the bottom. This step also helps the casserole brown beautifully on the bottom without burning.
Pour the melted butter into the pan and tip it around to coat all surfaces completely – don’t just brush it on or you’ll miss spots that will definitely stick. The butter also adds richness to the first layer of eggs that touch the pan, creating a slightly different texture that adds interest to each bite. This small step makes the difference between a casserole that slides out perfectly and one that leaves half of itself stuck to the pan.
Opening the oven door constantly prevents proper cooking
The temptation to check on the casserole every 15 minutes is strong, but opening the oven door releases heat and creates temperature fluctuations that prevent even cooking. Egg casseroles need consistent heat to rise properly and develop that perfect golden top. Each time you open the door, you’re adding several minutes to the cooking time and risking a casserole that doesn’t set properly.
The casserole is done when the top is golden brown and the center doesn’t jiggle when you gently shake the pan. If you must check, wait until at least 25 minutes have passed, then use the oven light to peek instead of opening the door. The internal temperature should reach 160 degrees for food safety, but the visual cues are usually enough to tell when it’s perfectly cooked and ready to rest before cutting.
Cutting into it immediately creates a messy disaster
Hot egg casserole straight from the oven looks ready to eat, but cutting into it immediately creates a runny mess that doesn’t hold its shape. The eggs need 10-15 minutes to finish cooking from residual heat and set up properly for clean cuts. This resting time allows the proteins to firm up and the moisture to redistribute evenly throughout the dish.
During this cooling period, the casserole continues to cook slightly from its own heat, ensuring the center is fully set without overcooking the edges. Use this time to set up your serving area or prepare other breakfast items. When you finally cut into it, you’ll get perfect squares that hold together beautifully instead of the soggy mess that happens when you’re too eager to dig in. The wait is worth it for picture-perfect results that actually taste as good as they look.
This make-ahead egg casserole transforms chaotic morning meals into effortless entertaining. The combination of proper technique and quality ingredients creates a dish that’s both impressive and foolproof. Next time you’re feeding a crowd, remember that the best breakfast casseroles are made the night before by people who understand that patience and preparation always win over last-minute scrambling.
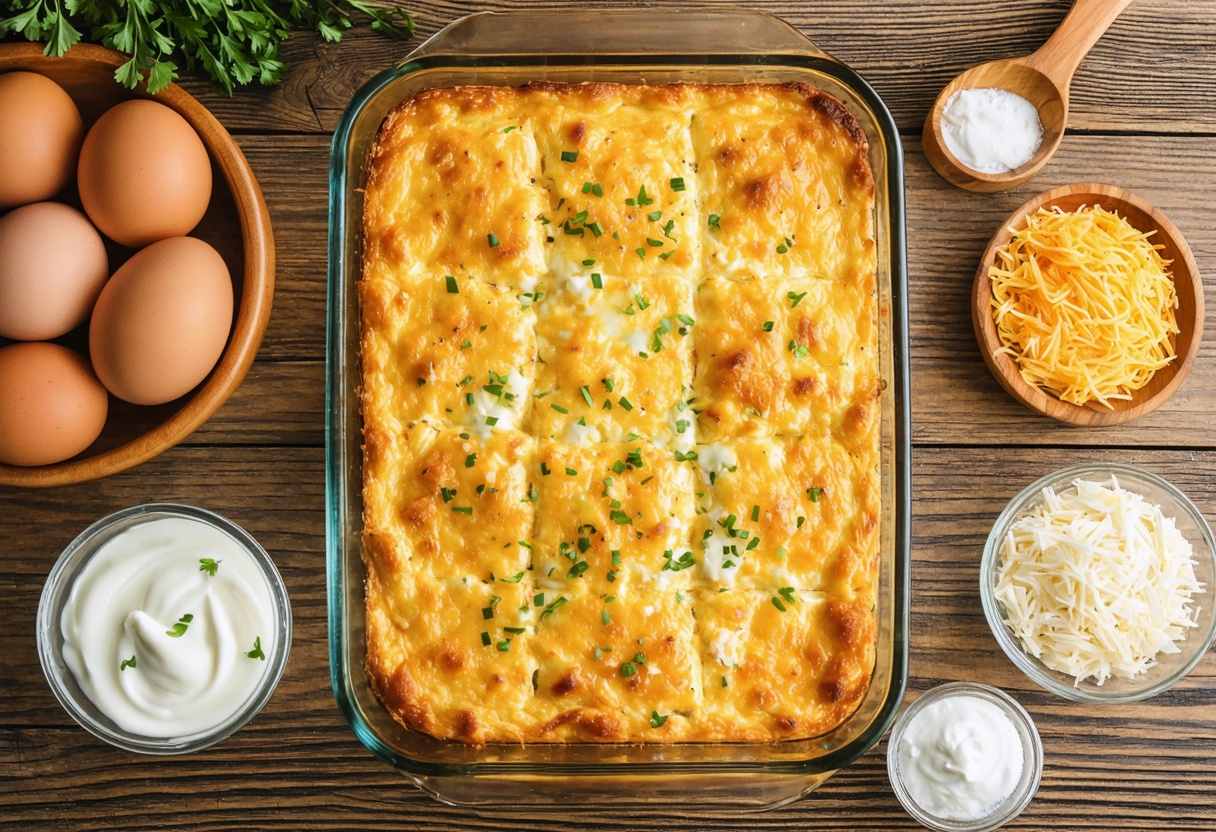
Perfect Make-Ahead Egg Casserole
Cuisine: American12
servings10
minutes35
minutes280
kcalThis fluffy, rich egg casserole preps the night before and bakes to golden perfection while you handle other breakfast tasks.
Ingredients
2 tablespoons butter, melted
18 large eggs
1 cup sour cream
1 cup whole milk
1 teaspoon salt
1/4 teaspoon black pepper
1/2 teaspoon dried mustard powder
2 cups sharp cheddar cheese, freshly shredded
Optional: 1 cup cooked bacon, sausage, or ham
Directions
- Preheat your oven to 350°F. Pour the melted butter into a 9×13 inch baking dish and tip the pan to coat all surfaces completely, including the sides. This ensures easy removal and adds richness to the bottom layer.
- In a large bowl or blender, combine the eggs, sour cream, milk, salt, pepper, and dried mustard powder. If using a blender, blend until completely smooth and frothy. If whisking by hand, whisk vigorously until no lumps remain and the mixture is well combined.
- Pour the egg mixture into the prepared baking dish. Sprinkle the freshly shredded cheese evenly over the top, then add any optional meat or vegetables. Gently press the toppings into the egg mixture with a spoon to ensure even distribution.
- Cover the dish tightly with plastic wrap or aluminum foil and refrigerate overnight, or for at least 4 hours. This resting period allows the flavors to meld and ensures the casserole will bake evenly with the perfect texture.
- Remove the casserole from the refrigerator 30 minutes before baking to take the chill off. Remove the cover and place in the preheated oven. Bake for 30-40 minutes, keeping the oven door closed during cooking.
- The casserole is done when the top is golden brown and the center doesn’t jiggle when gently shaken. The internal temperature should reach 160°F for food safety. Avoid opening the oven door until at least 25 minutes have passed.
- Remove from oven and let rest for 10-15 minutes before cutting. This cooling period allows the proteins to set properly and ensures clean cuts. The casserole will continue cooking slightly from residual heat during this time.
- Cut into squares and serve immediately. Store leftover portions in the refrigerator for up to 4 days, or freeze individual pieces for up to 3 months. Reheat in the microwave for 30-60 seconds until heated through.
Notes
- For best results, use freshly shredded cheese instead of pre-shredded to ensure smooth melting
- The casserole can be assembled up to 24 hours ahead of time for maximum convenience
- Add-ins like cooked vegetables, herbs, or different cheeses can be customized to your preference
- A 9×13 inch glass baking dish works best for even heat distribution
- Leftover portions freeze well and reheat perfectly in the microwave
Frequently Asked Questions
Q: Can I use egg substitute instead of whole eggs?
A: Yes, you can substitute with 2¼ cups of liquid egg substitute for the 18 whole eggs. The texture will be slightly different but still delicious. Keep all other ingredients and cooking times the same.
Q: What if I don’t have dried mustard powder?
A: You can substitute with ½ teaspoon of Dijon mustard mixed into the egg mixture, or simply omit it entirely. The mustard adds depth but isn’t absolutely essential for a good casserole.
Q: Can I make this in a smaller pan for fewer people?
A: Yes, you can halve the recipe and use an 8×8 inch pan. Reduce the cooking time to 25-30 minutes and check for doneness with the same visual cues.
Q: How do I know if it’s fully cooked in the center?
A: The center should be set and not jiggly when you gently shake the pan. You can also insert a knife in the center – it should come out clean with no wet egg mixture on it.