
Ever wonder why restaurant steaks always seem more tender than the ones you make at home? After testing seven different methods to tenderize steak, including pounding with a mallet, marinating overnight, and even poking holes with a fork, one surprising ingredient came out on top. Meat tenderizing powder, that simple pantry item you might have walked past a hundred times at the grocery store, actually works better than all those other techniques combined. It only takes about 15 minutes and costs a couple of bucks.
Why most tenderizing methods fall short
Think about all the advice you’ve heard about making steak tender. Maybe your dad swore by pounding it with a meat mallet, or your friend insists on marinating overnight. The truth is, most of these popular methods don’t deliver the results you’d expect. When tested side by side, techniques like salt brining for 20 minutes or smashing the meat with a mallet barely made a difference. The steak still came out tough in some spots, especially toward the center where it matters most.
Even the overnight marinade method, which sounds foolproof and adds great taste, doesn’t really tenderize the meat as much as you’d hope. Sure, the lemon juice adds some acidity that’s supposed to break down tough fibers, but after a full 24 hours of waiting, the steak still wasn’t incredibly tender. Plus, the marinade can give the outside a slightly gray color that doesn’t look as appetizing. When you’re spending good money on steak, waiting a whole day only to get mediocre results feels like a waste of time and effort.
What makes meat tenderizing powder actually work
Meat tenderizing powder contains an enzyme that comes from papaya or pineapple, and this enzyme does something pretty amazing to steak. It breaks down the proteins and connective tissue that make meat tough, kind of like how your stomach digests food. When you sprinkle it on both sides of your steak and let it sit for just 15 minutes, those enzymes get to work softening up all the chewy parts. The best part is you don’t need much of it, and it works way faster than waiting overnight for a marinade to maybe do its job.
The real surprise is how well this method works compared to physical tenderizing techniques. While a meat mallet might break up some surface tissue, it can’t reach deep into a thick cut like flank steak. The powder, on the other hand, penetrates the meat and works throughout the entire piece. After testing this method against six others, the difference was clear. The steak came out noticeably more tender with minimal effort and no special equipment needed. You can find meat tenderizing powder at pretty much any grocery store for just a few dollars, and one container lasts forever.
Picking the right cut makes a huge difference
Not all steaks need the same amount of help getting tender. Expensive cuts like ribeye, filet mignon, and New York strip already have lots of fat running through them, which naturally makes them softer and more tender. These cuts cost more because they’re already pretty foolproof, even if you’re not a great cook. But leaner cuts like flank steak, skirt steak, and brisket can be just as tasty for way less money, they just need a little extra attention to avoid coming out like shoe leather.
Flank steak is a perfect example of a cut that benefits from tenderizing. It’s got great beefy taste and costs a fraction of what you’d pay for a ribeye, but it’s naturally tougher because it has less fat marbling. When you use meat tenderizing powder on a thick cut of flank steak, you get that expensive steak texture without the expensive steak price tag. The same goes for skirt steak, which is amazing for fajitas or steak tacos. These cheaper cuts can turn into something special with just 15 minutes of prep time and a couple shakes of powder.
How to use tenderizing powder the right way
Using meat tenderizing powder isn’t complicated, but there are a few things to know so you don’t mess it up. Start by patting your steak dry with paper towels because the powder sticks better to a dry surface. Sprinkle about a teaspoon of the powder on each side of the steak, making sure to cover the whole surface evenly. Don’t go crazy with it though, because using too much can make the outside of the steak a little mushy, which isn’t what you want.
After you sprinkle the powder on, let the steak sit at room temperature for about 15 minutes. This gives the enzymes enough time to work their magic without overdoing it. Some people think leaving it longer will make it even more tender, but that’s not really true. Too much time can actually break down the meat too much and give it a weird texture. After 15 minutes, just season your steak with salt and pepper like normal, then cook it however you prefer. The powder doesn’t add any weird taste or smell, so your steak will taste exactly how it should.
The fork method works better than you’d think
If you don’t have meat tenderizing powder handy, there’s another method that actually works pretty well and doesn’t require buying anything special. Just grab a regular fork from your drawer and poke the steak all over on both sides. Push the fork in deep enough that the tines really penetrate the meat, not just surface level. This might sound too simple to work, but it’s surprisingly effective because the fork reaches much deeper than a meat mallet can.
When tested against other methods, the fork technique came in second place after the tenderizing powder. The holes from the fork tines break up the connective tissue throughout the steak, giving you a more tender result than just pounding the surface. The nice thing about this method is that everyone already has a fork, so there’s no extra cost or equipment to store in your kitchen. It takes maybe two minutes to poke holes all over your steak, and the results are way better than doing nothing at all. Just make sure to poke enough holes to really cover the whole piece of meat.
Why cooking temperature matters just as much
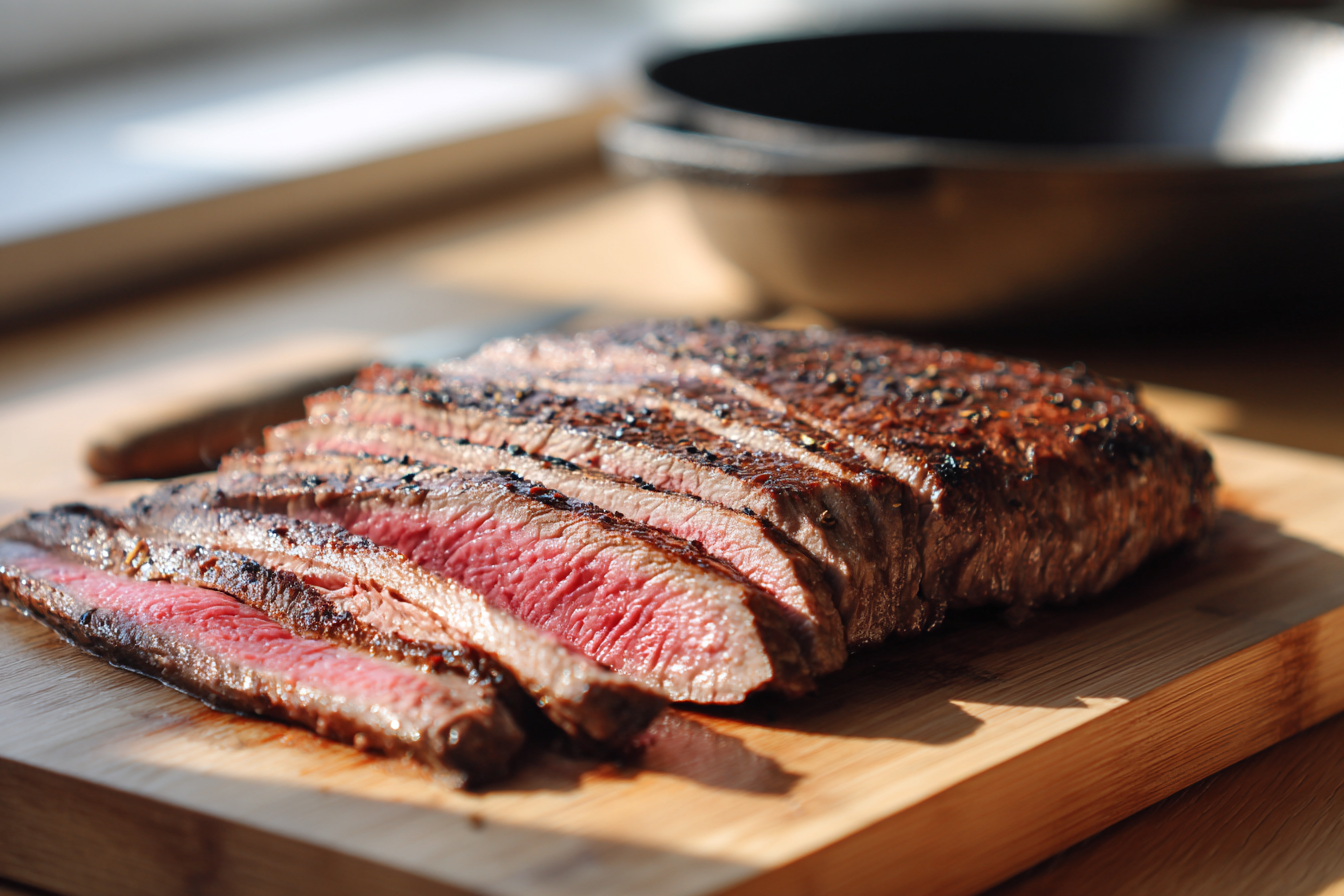
Here’s something that might upset some people, but it needs to be said. If you cook your steak all the way through until there’s no pink left, it’s going to be tough no matter what tenderizing method you use. That’s just how meat works. The more you cook it, the more the proteins tighten up and squeeze out moisture, leaving you with a dry, chewy piece of meat. Most steak lovers prefer medium-rare or medium because that’s where you get the perfect balance of cooked meat and tenderness.
For testing purposes, cooking the steaks to medium doneness worked well because it’s a good middle ground. There’s still some pink in the center, but it’s not super rare or bloody looking. If you really can’t stand any pink in your meat, then tenderizing becomes even more important because you’re fighting an uphill battle. The meat tenderizing powder helps a lot in these situations because it breaks down the proteins before cooking even starts. A meat thermometer is your best friend here, aim for about 135 degrees for medium-rare or 145 degrees for medium.
Cast iron gets you restaurant quality results
The way you cook your steak matters almost as much as how you tenderize it. Grilling is great if you have a backyard and the weather’s nice, but most people living in apartments or cities don’t have that option. A regular skillet on the stove works okay, but a cast iron grill pan is where the magic really happens. These pans give you those nice grill marks and a good char on the outside while keeping the inside tender and juicy.
Heat up your cast iron pan on medium-high heat and add a little oil to keep the steak from sticking. Once it’s hot enough that the oil shimmers, put your tenderized steak on the pan and let it cook for about five minutes per side for a medium doneness. Don’t move it around or flip it more than once, just let it sit there and develop that brown crust. After cooking, this is super important, let the steak rest for about 10 minutes before cutting into it. This lets the juices redistribute throughout the meat instead of running all over your cutting board when you slice it.
Why salt brining takes too long for regular dinners
Salt brining is one of those techniques that sounds really professional and makes you feel like a fancy chef. The idea is that you sprinkle a generous amount of salt on the meat, let it sit for a while, and the salt draws out moisture then reabsorbs it back into the meat along with the salt. This works great for a whole turkey at Thanksgiving when you’re planning days ahead, but for a weeknight steak dinner, it’s just not practical.
Testing showed that a 20-minute salt brine didn’t make much difference in tenderness at all. The steak looked good and tasted fine, but it wasn’t noticeably more tender than doing nothing. To really see results from salt brining, you’d need to do it for at least 24 hours, maybe longer. Who wants to think about dinner a full day in advance just to maybe get a slightly more tender steak? The meat tenderizing powder gives you better results in 15 minutes, so unless you’re really into meal planning way ahead of time, skip the salt brine method for regular steak dinners.
Slicing against the grain is the final secret
Even after all the tenderizing and perfect cooking, you can still mess up your steak at the very end by cutting it wrong. Every piece of meat has a grain, which is the direction the muscle fibers run. If you slice your steak the same way those fibers run, you’ll be biting through long strands of tough muscle. But if you slice across those fibers, perpendicular to the grain, you’re cutting the tough strands into short little pieces that are way easier to chew.
Look at your cooked steak and you’ll see lines running in one direction, that’s the grain. Turn your knife so it’s cutting across those lines, not parallel to them. This makes a huge difference in how tender each bite feels, especially with cuts like flank steak that have a really obvious grain pattern. Even if you did everything else perfectly, cutting with the grain instead of against it can make your steak seem tougher than it really is. It’s such a simple thing but so many people don’t know about it or forget to do it when they’re hungry and ready to eat.
Getting a tender, restaurant-quality steak at home doesn’t have to be complicated or expensive. While there are plenty of methods out there, meat tenderizing powder stands out as the clear winner for the best combination of results, ease, and time. For just a few dollars and 15 minutes of waiting, you can transform a tough, cheap cut into something that rivals what you’d pay twice as much for at a steakhouse. Keep a container in your pantry, remember to slice against the grain, and you’ll never have to settle for chewy steak again.
Perfectly Tender Flank Steak with Meat Tenderizer
Cuisine: American4
servings20
minutes10
minutes320
kcalThis flank steak turns out incredibly tender using a simple meat tenderizing powder technique that takes just 15 minutes before cooking.
Ingredients
2 pounds flank steak (about 1 1/4 inches thick)
2 teaspoons meat tenderizing powder
1 tablespoon kosher salt
1 tablespoon black pepper (freshly ground)
2 tablespoons vegetable oil
2 tablespoons unsalted butter
3 cloves garlic (smashed)
2 sprigs fresh thyme
2 sprigs fresh rosemary
Directions
- Remove the flank steak from the refrigerator and pat it completely dry on both sides using paper towels. This helps the tenderizing powder stick better to the surface. Let the steak sit at room temperature while you prepare the other ingredients, which should take about 5 minutes.
- Sprinkle 1 teaspoon of meat tenderizing powder evenly over one side of the steak, making sure to cover the entire surface. Flip the steak over and sprinkle the remaining teaspoon on the other side. Let the steak rest at room temperature for exactly 15 minutes to allow the enzymes to work, but don’t leave it longer or the texture can become too soft.
- After the 15 minutes have passed, season both sides of the steak generously with kosher salt and freshly ground black pepper. Press the seasonings gently into the meat so they stick well. The salt and pepper add great taste and help form a nice crust when the steak cooks.
- Heat a cast iron grill pan or heavy skillet over medium-high heat for about 3 minutes until it’s very hot. Add the vegetable oil and swirl it around to coat the pan evenly. You’ll know it’s ready when the oil starts to shimmer but not smoke.
- Carefully place the flank steak in the hot pan and let it cook without moving it for 5 minutes to develop a nice brown crust. Resist the urge to peek or flip it early, as moving the steak prevents proper browning. You should hear a good sizzle when the meat hits the pan.
- Flip the steak using tongs and immediately add the butter, smashed garlic cloves, thyme, and rosemary to the pan. Let the steak cook for another 5 minutes on the second side for medium doneness. Tilt the pan slightly and use a spoon to baste the steak with the melted herb butter during the last minute of cooking.
- Transfer the cooked steak to a cutting board and let it rest for 10 minutes before slicing. This resting time is crucial because it allows the juices to redistribute throughout the meat instead of running out when you cut it. Cover the steak loosely with foil if you want to keep it warm.
- Look at the steak to identify which direction the muscle fibers run, then slice the meat against the grain into strips about 1/2 inch thick. Cutting against the grain shortens the muscle fibers and makes each bite much more tender. Serve immediately with your favorite sides.
Notes
- Don’t leave the meat tenderizing powder on for more than 15 minutes, as the enzymes can over-tenderize the meat and create a mushy texture on the surface.
- If you don’t have a meat thermometer, you can test doneness by pressing the steak with your finger – medium should feel like the fleshy part of your palm when you touch your thumb to your middle finger.
- Flank steak works great for this recipe, but you can also use skirt steak, sirloin, or any other lean cut that benefits from tenderizing.
- Leftover steak can be stored in an airtight container in the refrigerator for up to 3 days and makes great steak sandwiches or salad toppers.
Frequently asked questions about tenderizing steak
Q: Can I use meat tenderizing powder on expensive cuts like ribeye or filet mignon?
A: You can, but you really don’t need to. These expensive cuts already have lots of fat marbling that keeps them naturally tender, so using tenderizing powder is overkill. Save your money and the tenderizer for leaner, tougher cuts like flank, skirt, or round steak where it actually makes a noticeable difference.
Q: Will meat tenderizing powder change the taste of my steak?
A: No, meat tenderizing powder is basically tasteless and odorless, so it won’t affect the beefy taste of your steak at all. The powder just contains enzymes that break down tough proteins without adding any weird aftertaste. Season your steak normally with salt and pepper after using the tenderizer, and it’ll taste exactly like you want it to.
Q: What happens if I leave the tenderizing powder on too long?
A: Leaving it on for more than 20 minutes can make the outside of your steak mushy or mealy, which isn’t a great texture. The enzymes keep working the whole time they’re on the meat, so more time isn’t better in this case. Stick to the 15-minute guideline for the best results and set a timer so you don’t forget about it.
Q: Can I tenderize frozen steak or does it need to be thawed first?
A: You need to thaw the steak completely before using any tenderizing method. The tenderizing powder needs to make contact with the meat fibers to work, and it can’t penetrate frozen meat. Thaw your steak in the refrigerator overnight, pat it dry, then apply the tenderizer powder before cooking.