
Most people think they know how to fry an egg, but there’s a huge difference between the sad, rubbery eggs most of us make at home and the ones that show up at fancy brunch spots. The secret isn’t some expensive ingredient or complicated technique. Professional chefs use a method called butter basting that completely transforms ordinary eggs into something worth getting excited about. It takes the same amount of time as regular frying, but the results are so much better that once you try it, going back to your old method will feel impossible.
Why most home cooks mess up their eggs
Think about the last time you fried an egg. Did you crank up the heat to get breakfast done faster? That’s exactly where things go wrong. Most people grab cold eggs straight from the fridge, toss them into a barely heated pan with a tiny bit of butter, and turn the heat up high. What happens next is predictable—the edges turn brown and crispy while the centers stay slimy, or the whites get tough and rubbery before the yolks cook through. It’s frustrating because eggs seem so simple, yet getting them right feels like guesswork.
The real problem isn’t your cooking skills. It’s the approach. Professional chefs understand that eggs need patience and the right amount of fat in the pan. They use medium-low heat and give the proteins time to set gently. When you rush the process with high heat, the proteins tighten up too quickly, squeezing out moisture and creating that unpleasant rubbery texture. The other mistake is using too little fat—not just for preventing sticking, but because fat is what carries and develops all those rich, satisfying tastes that make restaurant eggs so much better than homemade ones.
How butter basting actually works
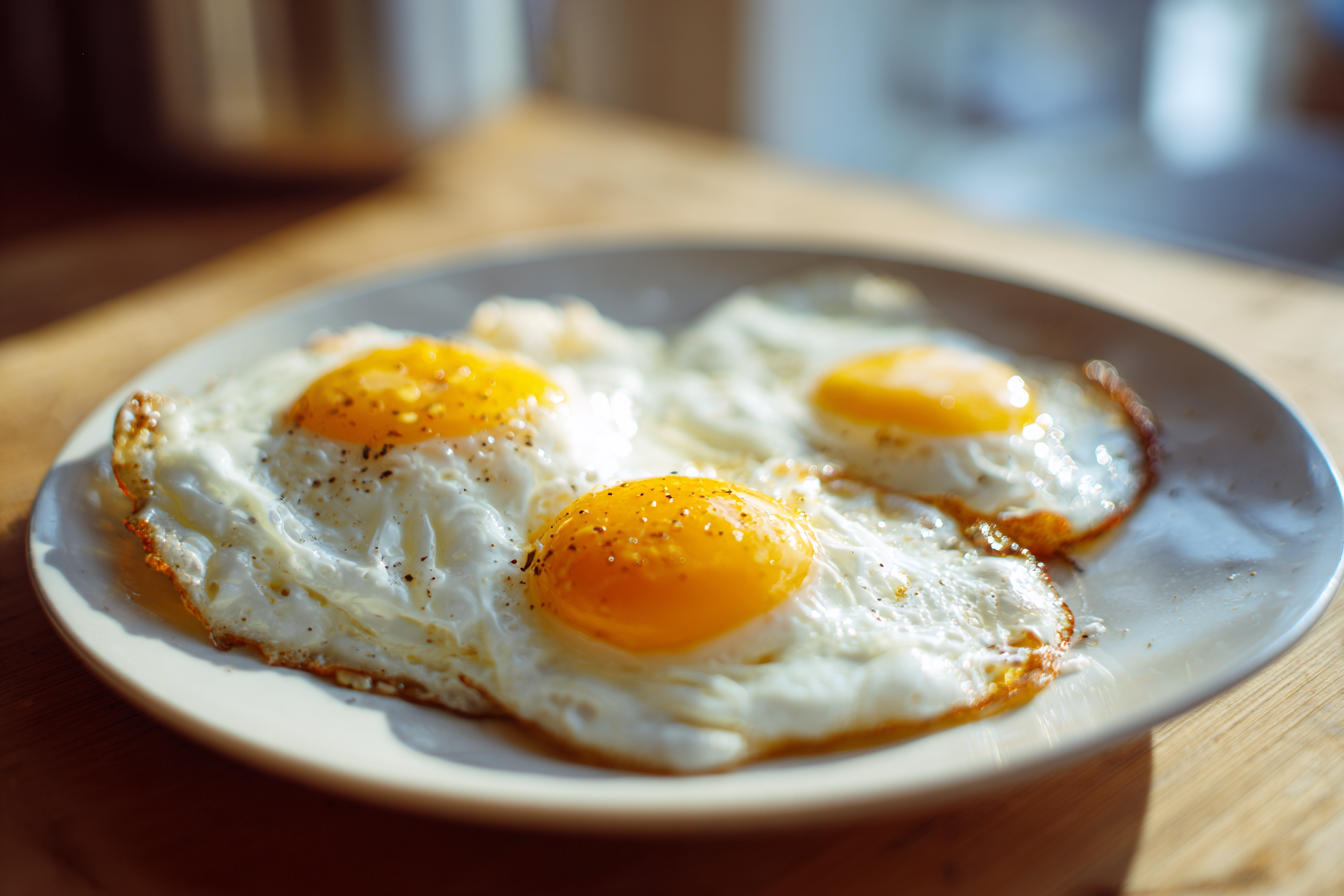
Butter basting sounds fancy, but it’s surprisingly straightforward. You start by heating olive oil and butter together in a pan over medium-low heat. Once the butter starts foaming, you add your eggs. Here’s where the magic happens—instead of just letting the eggs sit there, you tilt the pan to collect the melted butter in a pool, then use a spoon to repeatedly scoop that hot butter over the tops of the egg whites. This constant basting cooks the top surface without flipping, which means your yolks stay perfectly runny while the whites set completely.
The combination of olive oil and butter is key to making this work. Butter alone burns too easily at the temperatures needed for cooking eggs, while oil alone doesn’t have much taste. Together, they create the perfect cooking medium—the oil keeps the butter from burning, while the butter provides that rich, nutty taste that makes everything better. As you baste, the hot fat bathes the eggs, creating crispy golden edges on the whites while keeping the centers tender. The gentle heat ensures the yolks warm through without turning solid, giving you that ideal runny center that’s perfect for dipping toast.
The right pan makes everything easier
Ever tried to slide a fried egg onto a plate only to have it stick and tear? The pan you choose makes a massive difference. A good nonstick pan is probably your best bet for this technique. The slick surface lets eggs release effortlessly, and nonstick pans heat up quickly and evenly. For butter basting specifically, look for a nonstick pan with slightly sloped sides—this shape makes it easier to tilt the pan and collect the butter in one spot for scooping. An 8-inch pan is the sweet spot for cooking one or two eggs because it keeps the butter and oil concentrated enough for effective basting.
Cast iron skillets also work well if you have one that’s properly seasoned. They hold heat incredibly well and can create those beautifully crispy edges that people love. The main downside is that cast iron takes longer to heat up, and if it’s not well-seasoned, eggs can stick. Whichever pan you choose, size matters more than most people realize. A pan that’s too large will spread out your butter and oil too thin, making it hard to collect enough for basting. A pan that’s too small will crowd the eggs, making them cook unevenly. Getting this detail right makes the whole process smoother and more reliable.
Getting the temperature exactly right
Temperature control is where most egg-cooking disasters happen. Too hot, and your eggs turn rubbery with burned edges before the centers are done. Too cool, and they just sit there getting flat and lifeless. The ideal temperature for butter basting is medium-low, which translates to about 275-300 degrees. This might feel painfully slow if you’re used to cranking the heat, but patience pays off. Give your pan at least two to three minutes to come up to temperature before adding any fat. You can test readiness by flicking a tiny drop of water onto the surface—it should sizzle and evaporate fairly quickly.
Once you add the butter and oil, watch for visual cues. Wait until the butter is fully melted and starting to foam before adding your eggs. During cooking, the whites should set gradually from the edges inward, taking about two minutes total. If they’re setting almost immediately upon hitting the pan, your heat is too high. The butter should maintain a gentle foam throughout cooking—if it starts browning or smoking, pull the pan off the heat for a moment and lower the temperature. These small adjustments make the difference between good eggs and great ones.
When and how to add seasonings
Salt and pepper seem simple enough, but timing matters more than you’d think. For butter basting, you have two good options. Either season the butter-oil mixture in the pan before adding the eggs, letting the seasonings infuse into the fat, or season the eggs directly about 30 seconds before they finish cooking. What you don’t want to do is salt the eggs too early. Salt breaks down the proteins in egg whites, which can result in a watery, broken texture. Wait until the whites are mostly set before adding salt directly to the eggs.
Beyond basic salt and pepper, the butter basting method opens up interesting seasoning possibilities. Try dropping a smashed garlic clove or a sprig of fresh thyme into the butter as it melts. The aromatics perfume the fat, which then transfers those tastes to the eggs as you baste. Smoked paprika stirred into the butter creates a bacon-like effect without any meat. Red pepper flakes add a nice kick. A tiny pinch of cumin seeds toasted in the butter brings an earthy warmth. These additions don’t add extra work—you’re just flavoring the fat you’re already using.
Game-changing additions to try
Once you’ve mastered the basic butter basting technique, experimenting with additions becomes really fun. Minced garlic or shallots sautéed briefly in your butter-oil mixture before adding the eggs will completely transform the taste. Cook them just until fragrant but not browned—about 30 seconds—then crack in your eggs. The aromatic compounds saturate the fat, which then coats the eggs during basting. It’s such a simple addition, but the difference is dramatic. The eggs go from plain to almost restaurant-fancy with minimal extra effort.
Another option that’s becoming more popular is using chili crisp oil instead of plain olive oil. The spicy, crunchy bits in chili crisp create textural contrast and heat that cuts through the richness of the yolk. For something more indulgent, try adding a teaspoon of heavy cream to the butter just before you start basting. The cream creates an almost custard-like quality in the whites that’s incredibly luxurious. Some people even fry their eggs in bacon fat instead of oil—if you’ve cooked bacon for breakfast anyway, save the rendered fat and use it for your eggs. The smoky, savory quality it adds is unbeatable.
Nailing the timing for perfect doneness
Everyone has their own preference for egg doneness, and butter basting works for all of them. For sunny-side up eggs with runny yolks and fully set whites, the whole process takes about two to three minutes. The key advantage of basting is that you don’t need to flip the egg to cook the top surface of the whites. The hot fat does that job for you, which means you can preserve that beautiful intact yolk. Watch for the whites to turn from clear to opaque white, with no translucent bits remaining around the yolk.
If you prefer over-easy eggs, wait until the whites have mostly set—about two minutes—then gently flip the egg using a thin, wide spatula. Let it cook for just 10 to 15 seconds on the second side. This creates a thin film over the yolk while keeping it runny inside. Over-medium eggs need about 30 seconds after flipping, and over-hard eggs need a full minute to 90 seconds. The beauty of starting with the butter basting technique is that the whites are already perfectly cooked by the time you flip, so you’re just adjusting the yolk to your preference. No more overcooked, rubbery whites while you wait for the yolks to set.
Different fats create different results
While butter and olive oil form the foundation of this technique, experimenting with different fats opens up a whole world of possibilities. Bacon fat is probably the most popular alternative. If you’ve cooked bacon for breakfast, pour off most of the fat but leave about two tablespoons in the pan. Proceed with the basting technique just like you would with butter and oil. The result is eggs with a smoky, meaty depth that regular butter can’t match. It’s particularly good if you’re making breakfast sandwiches or serving the eggs alongside toast.
Another excellent option is ghee, which is clarified butter used in Indian cooking. Ghee has a higher smoke point than regular butter, so it won’t burn as easily, and it has this wonderful nutty, caramelized taste. You can find ghee at most grocery stores now, usually near the oils or in the international foods aisle. For something a bit fancier, try making compound butter ahead of time—butter mixed with herbs, citrus zest, or spices—and use that for basting. A lemon-herb butter creates bright, fresh-tasting eggs that are perfect for spring and summer. The point is that once you understand the technique, you can adapt it to create completely different results just by switching up the fat.
Fixing common problems that come up
Even with good technique, things can go wrong. The most common problem is eggs that stick to the pan. This usually means you didn’t use enough fat or the pan wasn’t properly preheated. Make sure you’re using a full tablespoon each of butter and oil for two eggs—it seems like a lot, but that’s what makes the technique work. Let your pan preheat for at least two minutes before adding any fat. If you’re using a nonstick pan and eggs are still sticking, the coating might be worn out and it’s time for a new pan.
Another frustrating issue is whites that spread too thin and become wispy around the edges. This happens when eggs are too cold. Always let your eggs sit at room temperature for at least five to ten minutes before cooking. If you’re short on time, place them in a bowl of warm (not hot) water for a few minutes. Adding the eggs when the butter is actively foaming helps the whites set quickly, preventing excessive spreading. Broken yolks are another common complaint. Instead of cracking eggs directly over the hot pan, crack them into a small bowl first. This lets you check for shell fragments and gives you much better control when you slide them into the pan.
The butter basting technique proves that you don’t need fancy ingredients or complicated methods to make restaurant-quality food at home. With the right fat, proper temperature control, and that simple basting action, ordinary eggs transform into something really special. The crispy edges, tender whites, and perfectly runny yolks rival anything you’d get at an expensive brunch spot. Give this method a try tomorrow morning and see how different eggs can taste when you treat them right.
Perfect Butter-Basted Fried Eggs
Cuisine: American2
servings5
minutes3
minutes220
kcalRestaurant-quality eggs with crispy edges and silky yolks made using a simple chef technique.
Ingredients
2 large eggs, at room temperature
1 tablespoon unsalted butter (preferably European-style)
1 tablespoon extra virgin olive oil
¼ teaspoon kosher salt
Freshly ground black pepper, to taste
Optional: ¼ teaspoon red pepper flakes
Optional: 1 small clove garlic, smashed
Optional: 1 sprig fresh herbs (thyme, rosemary, or sage)
Optional: flaky sea salt for finishing
Directions
- Take your eggs out of the refrigerator at least 5 to 10 minutes before cooking to bring them to room temperature. This helps the whites hold together better and prevents them from spreading too thin in the pan. If you’re short on time, place the eggs in a bowl of warm water for about 3 minutes.
- Place an 8-inch nonstick or well-seasoned cast iron skillet over medium-low heat and let it preheat for 2 to 3 minutes. The pan should be evenly heated but not smoking hot. Test the temperature by flicking a tiny drop of water onto the surface—it should sizzle and evaporate fairly quickly.
- Add the olive oil to the preheated pan, swirling to coat the bottom. Immediately add the butter and any optional aromatics like garlic or herb sprigs. Let the butter melt completely and begin to foam gently—this should take about 30 seconds. The butter should not brown or smoke; if it does, reduce the heat slightly.
- Crack each egg into a small bowl or ramekin first to check for shell fragments. When the butter is actively foaming, gently slide the eggs from the bowl into the pan, keeping them slightly separated. The whites should immediately begin to set at the edges while remaining slightly translucent near the yolks.
- Once the eggs are in the pan, tilt the skillet slightly to pool the butter-oil mixture on one side. Use a large spoon to repeatedly scoop the hot butter over the egg whites, focusing on the areas around the yolks where the whites take longest to cook. Continue this basting motion for about 1 to 2 minutes, until the whites are fully opaque and set but the yolks remain runny.
- About 30 seconds before the eggs are done, season them with the kosher salt, freshly ground black pepper, and red pepper flakes if using. The whites should be completely set with slightly crispy, golden edges, while the yolks should still jiggle slightly when you shake the pan.
- Remove the pan from heat and use a thin, flexible spatula to gently slide under each egg, loosening it from the pan. Carefully transfer the eggs to serving plates, allowing any excess butter to drip back into the pan.
- Finish with a pinch of flaky sea salt if desired and serve immediately while the eggs are still hot and the yolks are perfectly runny. These eggs are excellent on buttered toast, over hash browns, or alongside bacon and breakfast potatoes.
Notes
- European-style butter with higher fat content foams more beautifully and provides richer taste than standard American butter. Brands like Kerrygold or Plugra work excellently.
- If you prefer over-easy eggs, flip them gently after the whites set and cook for just 10 to 15 seconds on the second side.
- For extra richness, add a teaspoon of heavy cream to the butter just before you start basting.
- Leftover bacon fat can replace the olive oil for a smokier taste—use about 2 tablespoons total fat.
- The eggs will continue cooking slightly after removing from heat, so take them off when they’re just a touch underdone for your preference.
Frequently asked questions
Q: Can I use margarine instead of butter for this technique?
A: Margarine won’t work as well because it contains water and emulsifiers that don’t foam the same way butter does. Real butter is essential for the proper foaming action and rich taste that makes this technique special. If you’re concerned about butter burning, the olive oil in the recipe protects it, so stick with real butter for best results.
Q: How do I know when the eggs are done if I like runny yolks?
A: The whites should be completely opaque with no clear, translucent bits remaining, especially around the yolk. The yolk should still jiggle when you gently shake the pan. For sunny-side up eggs, this typically takes 2 to 3 minutes of basting. The top of the yolk will have a slight sheen but won’t be glossy and raw-looking.
Q: Why do my eggs stick even when using a nonstick pan?
A: This usually happens because the pan wasn’t hot enough before adding the fat, or you didn’t use enough butter and oil. Make sure to preheat your pan for at least 2 minutes and use a full tablespoon each of butter and oil. Also, nonstick coatings wear out over time—if your pan is several years old and things are sticking, it might be time to replace it.
Q: Can I cook more than two eggs at once using this method?
A: You can, but you’ll need a larger pan and more butter and oil to maintain enough fat for proper basting. For four eggs, use a 10 or 12-inch pan with 2 tablespoons each of butter and oil. Keep in mind that managing the basting for multiple eggs takes more attention, and the eggs may cook less evenly than when you’re just doing one or two at a time.